I see this question come up from time to time on the internet. A quick search on Google or other platforms will turn up an AI vague answer and pages of sponsored ads as well as some old Reddit posts.
Keep in mind, I am not an acoustic engineer, and although I have built quite a few Studios, the following is derived from my experience being in construction for forty years and working with one of the top studio design and build companies, The Studio People, and of course my opinions. Also, the diagrams are for clarity and are just one way of executing a particular task, there are many.
To be honest, this is actually a very complexed question, one which has to be started with several questions itself.
Basically a Recording Room needs to be designed and assembled with some strict rules, if, and a big if, you want it to perform similarly to the well designed commercial studios. This is an important factor for standardization. In simple terms, when you mix sounds, you will make them sound good in your environment. However, if your environment is poorly assembled (IE, lots of reflective surfaces colouring what you are hearing from the monitors) you will attempt to adjust that shortfall out of the mix, thus creating a project that potentially sounds nasty when played in another studio or end user’s environment. You don’t want that, right? Now there are a lot of theories on how to design a perfect space. Just have a conversation with several different acoustic engineers. This is why when you go into a studio it will look very different from the next, not just cosmetically, but how the sounds are treated after being generated from the monitors in the Control Room and instruments in the Recording areas.
The Project
So here are some questions you need to answer, before you get your wallet out:
A) What is the purpose of the studio?
B) What is my financial budget?
C) What is my time budget?
D) Is this a for profit adventure, thus where are my clients?
E) Do I have a suitable space for the project or do I need to lease/buy one?
F) How critical are my expectations of excellence?
G) Do I have all the equipment to furnish a studio space that meets my goals?
H) What is my level of expertise?
I) Do I have the skill-set to design the space?
Some thoughts on each:
A) Is this just a hobby, or are you using it for personal use as a career composer, or are you hiring it out either with you as the engineer, or for self ops. This potentially will have huge bearing on the facility you will need to build and the level of excellence.
B) Egg crates and carpet on the walls aside, even a self-build garage studio can have a hefty price tag, due to the cost of materials time and space. So you need to have a realistic idea of what you can achieve with the budget and space you have. Also, as with any construction project, whatever numbers you come up with, add at least 20% for over runs. Source and secure this funding prior to any type of planning. We all have that millionaire aunty, but does she love you enough to fund the project in its entirety? Find out now, and get a cheque.
C) You are going to do all the work yourself! When? Let us be honest with ourselves here. Even a simple studio can absorb substantial numbers of hours, even for a professional. Do you have the free time? Ask yourself, what is my realistic hourly rate? For instance, if you are a Motor Mechanic as your full time job making an average of $60 per hour, it is cost affective for you to build walls and lay floor, especially if you have options for extra overtime pay. Now if you just sit at home dreaming of having the next Abby Road, then yes, it is a good idea to do as much of the labor as you are able and skilled to do.
D) If this is going to rely on attracting clients, you need to be realistic about your catchment area. Will people travel to your location? Now that can depend on your status in the industry and what your studio offers. But be honest, people are generally lazy, so they may be happy paying a higher price or receiving a little lower quality for better access. Keep this in mind when choosing a location.
E) Space is important. If you plan on constructing a decent quality room or facility, then keep in mind isolation takes space, vertically and horizontally. A standard bedroom for instance will lose a substantial amount of useable square footage from correctly isolating the walls and a lot of height from ceiling and floor treatments. So the decision would be to reduce the isolation requirements in order to gain usability of the space. This may substantially impact the actual usability of the room if noise pollution is a factor, either outside in or inside out. This factor is generally a trade off in every build. Perfection will generally cost substantially more money, as a much larger space would be required to give almost total isolation. Thus, it is proportionate. “More money in equals more isolation achieved”, would be a good way to look at it.
F) Some people will just not settle for anything but the best, subjectiveness aside. Also the environment or personal preferences can play a big part in design requirements. As with Isolation, the perfect way would be a concrete box inside a concrete box with no doors, windows or holes of any kind. Not a nice place to work! Just take a look at Peter Gabriel’s Real World Studio, very unconventional. I would say Peter purchased that building because of it beauty and surroundings. So not being respectful to those attributes during design would be a crime. I am also sure that it was an acoustic design engineer’s nightmare to make that work correctly and I am also sure it is not perfect in the technical sense. So have a realistic mind set with what you want to achieve from your own build. Unless you have an unlimited budget, there will be some tradeoffs of what can be achieved. With that trade-off, are you prepared to potentially suffer from isolation issues or acoustic issues?
G) This can be both ways. I see lots of remarks on line about what are better speakers for my space. This is both professionally and Home Entertainment wise. You can spend fifty grand on a pair of PMCs, but if the room is horrid, you will not solve the problem. OK yes, PMCs will make the horrid way less horrid, but you get my point. Address the room first. Then you may find twenty grand PMCs will suffice. Remember, a Studio or Home Entertainment room is a system. Any part of that system that is not performing 100% if going to derogate the system as a whole. You are going to spend a lot of cash here, make sure your budget outline encompasses all that is required to complete the whole project. “With Padding”
H) The studio is a very technical environment. You need to be honest about you ability and level of conscientiousness. Small errors can lead to big problems. If you are self building, you need to be aware of all the hats you will need to wear to complete. There are also safety concerns here, from structural to the trades, especially electrical. You need to be able to follow instructions, and be versed with the use of hand tools and best practices. Critical tasks can range from building wall assemblies to soldering d-subs. Perhaps you are better at some things than others, most of us are. This then needs to be in your planning and budget. Having outside help can have its trials. One of our clients had an outside contractor wire the audio in his composer suite, a substantial job (as he has a lot of outboard gear with patch bays). Three different guys to be exact. Ended up costing way more than he budgeted, damaged his DAW worktop with the soldering iron, left with noise on the lines somewhere and took months. Also to extract the Amps from the machine closet, he has to reach in the back and unplug all, as the guy did not leave any slack in the runs. So keep that in mind. Of course, the best way is to just have a company turnkey the project, and if the budget allows, I would totally endorse this thinking. The problem may be finding a company who can do it all in house. In the UK and Europe, The Studio People can do everything in house. Give them a call.
I) Great if you have, but most don’t. If your budget does not stretch to having a turn-key build, I would strongly suggest having a Studio Designer design and do working drawings for you to follow. This way, whether you build it yourself or hire sub contractors, you will have a very specific design to follow. One which has their guaranty to meet specs. And I am sure access to the designer, if clarification is needed. I have built some studios in the past where the owner worked along-side our crew. Sweat equity. It worked very well, and the owner saved a decent amount of cash, without the risk of screwing something up. Learning many things along the way.
THE BUILD
-a two part exercise, Isolation and Acoustics.
Isolation- is controlling noise pollution either from: outside to inside (or room to room) colouring what you are listening to or directly getting into the mix and inside to outside, disturbing the neighbors. Acoustics- is controlling the response of the room, and ultimately is going to affect how you mix your sounds. This gets very technical and outside the scope of this post. As I have mentioned previously, is also very subjective. But generally your control room needs to be as balanced and as standardized as possible. The goal here would be: you should be able to take your mix to any other well designed control room and it would sound very similar. The Live room, Drum room, Vocal booth and any other recording rooms should have a variety of acoustically tuned areas especially if you intend having a wide array of client genres. However, if it is just for your use, then you should be more concerned with catering to your acoustic needs.
The Design – Isolation
Wall:
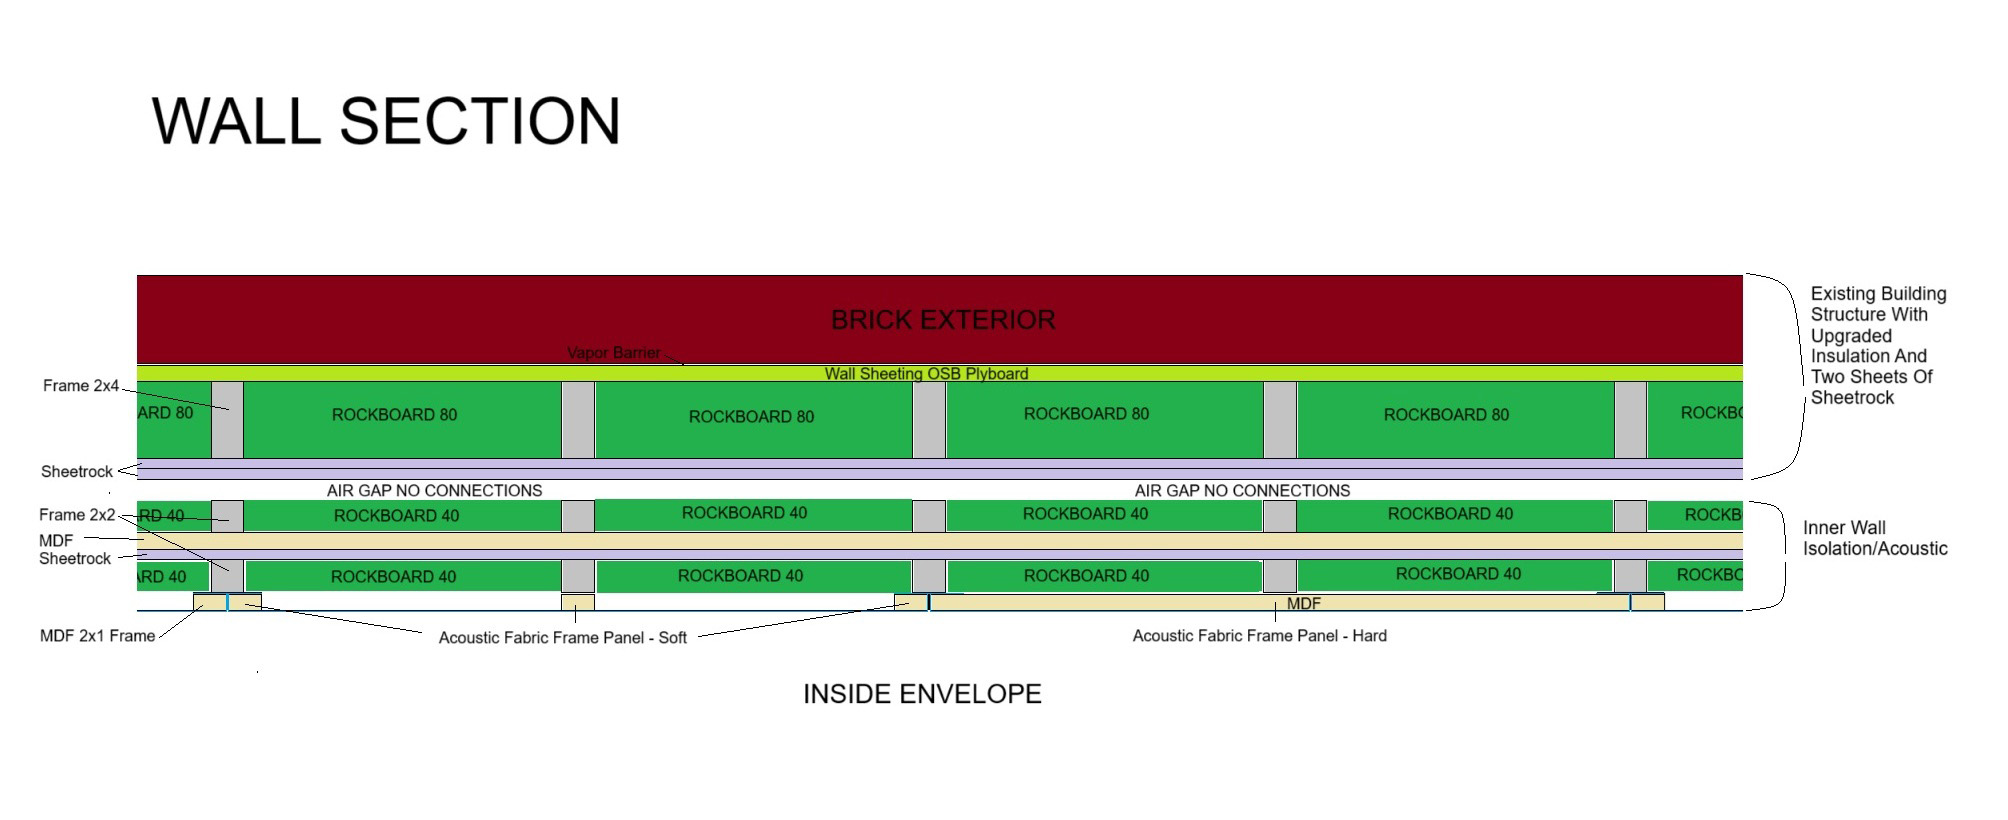
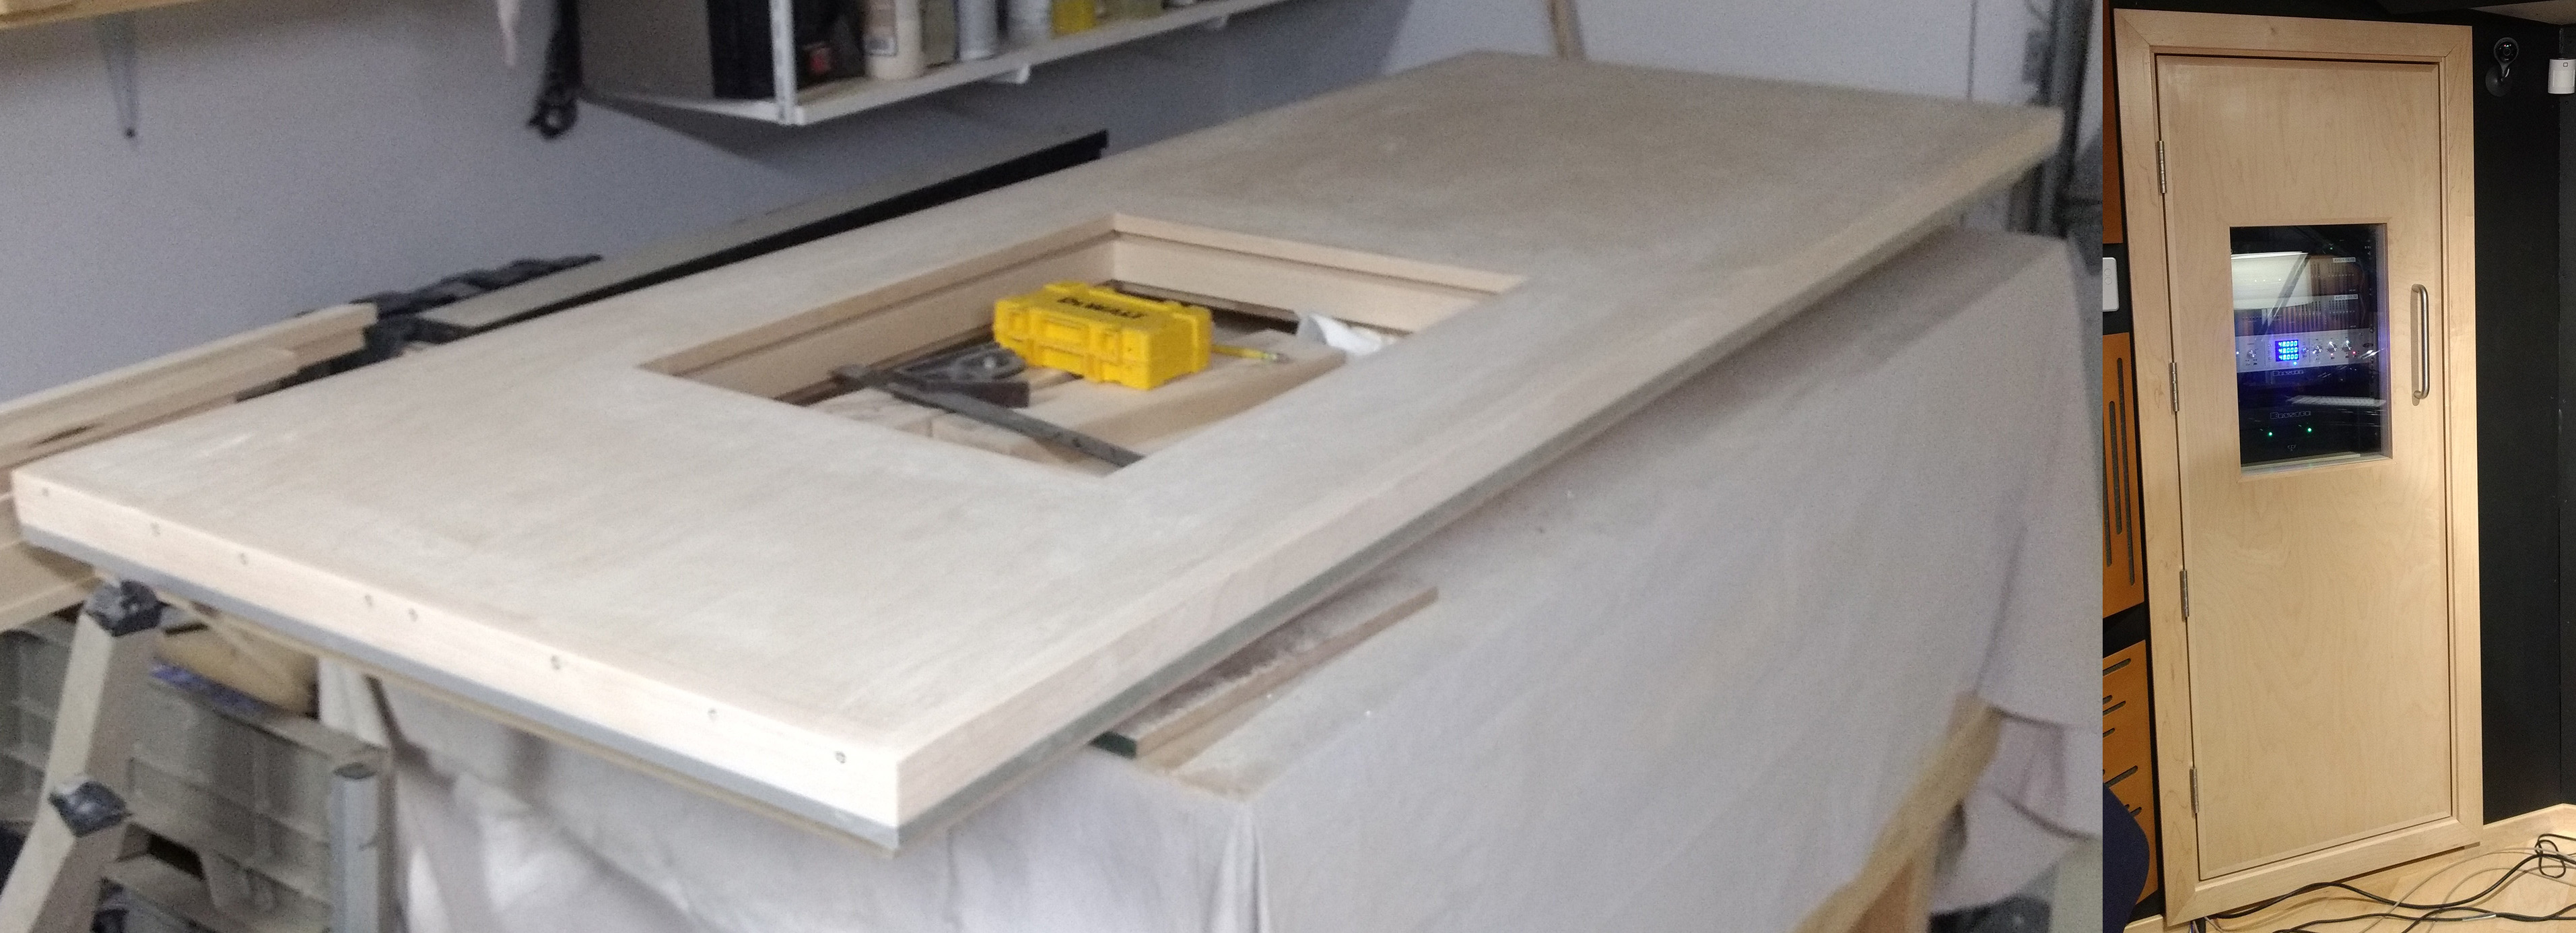
Addressing Isolation, you need to consider how much space you have. Air gap is your friend. The best results for isolation would be a fully floating room (see Float Room detail below). Box in a box. Keep in mind that you will generally lose at least 150mm - 6” around the perimeter and at least 300mm - 12” from floor to ceiling, just for the isolation. If that is not an option, you will have to bulk up the walls as much as you can with sound absorbing and dense materials like gypsum, MDF and Rockwool products. Think about the structure’s surfaces like a big speaker cones, everything flexes. The thicker and more dense the structure, the less flex it will demonstrate, thus communicating less energy (sound). Investigate how your existing wall is constructed. Concrete is excellent, but most structures especially in USA are timber frame. These are generally poorly constructed, fairly flexible and full of holes to the exterior. It may be a good idea to remove the inner skin and insulation allowing you to seal up these air gaps first. Then replace the standard insulation with a very dense version, like Rockboard 80 mineral batts. Re-skin the wall with two layers of sheetrock and seal all joints to other surfaces with a flexible sealer like Big Stretch. Now you can add more thickness on the inside of the wall using more framing, Rockboard, MDF and sheetrock board. (See wall assembly diagram below)
Floor:
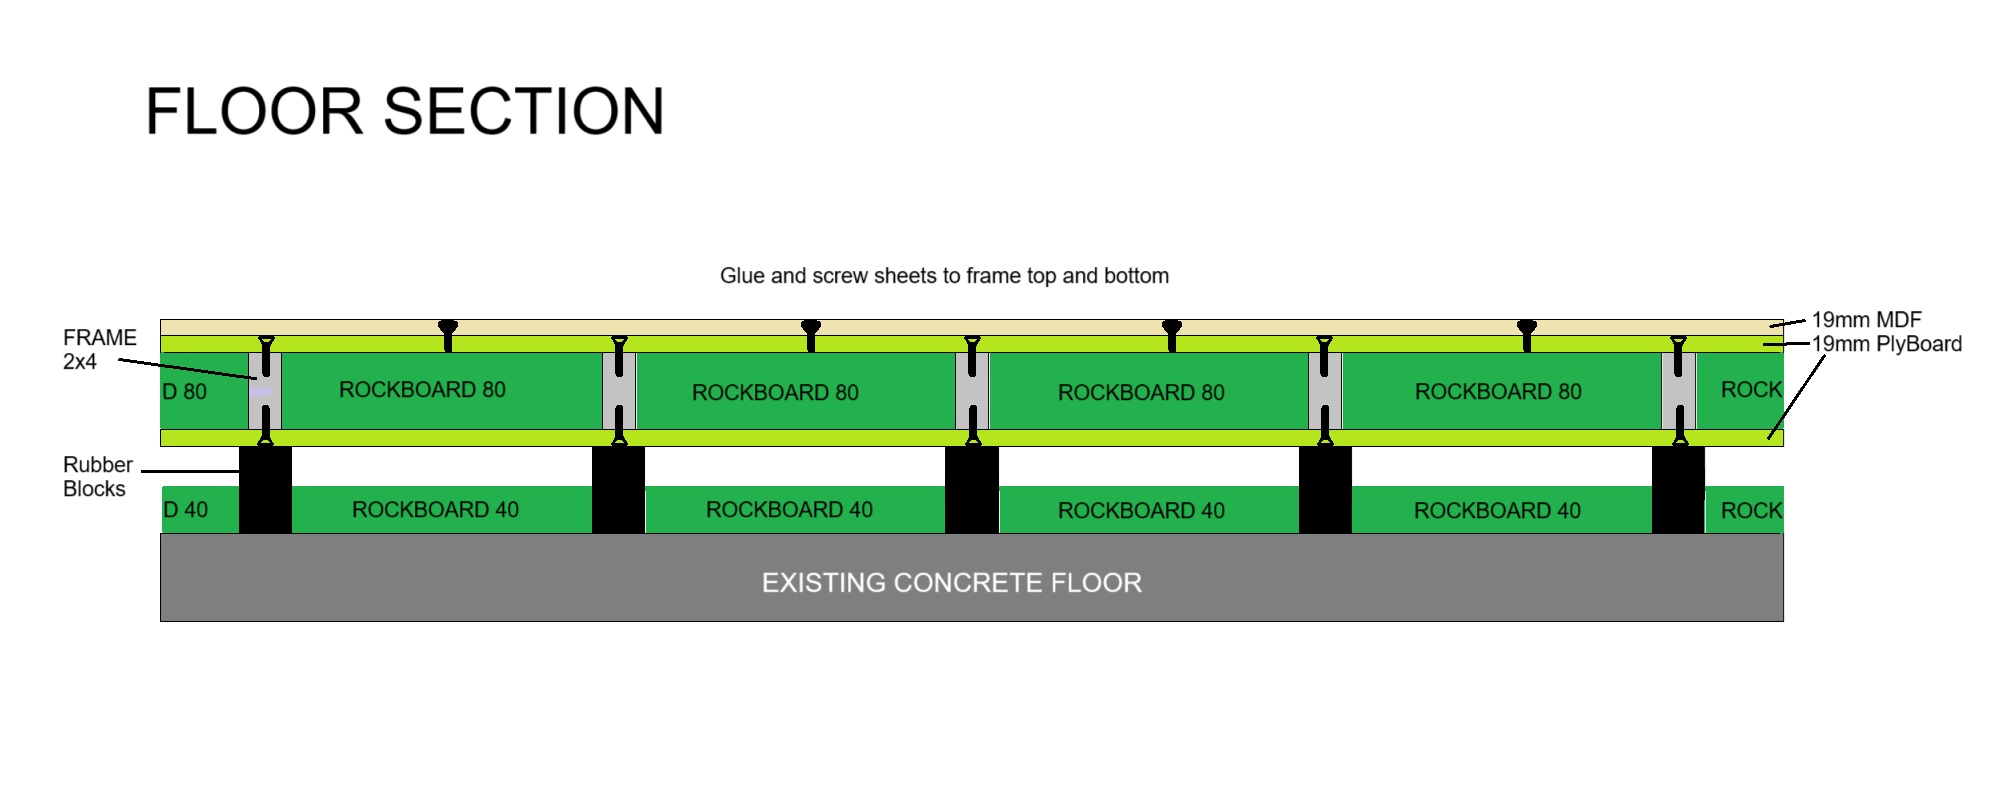
If the subfloor is Concrete, this is better than wood. However, low frequency can travel through concrete also. So if you have the head room, I would advise having an additional floor structure on top either way. This needs to be a separate structure that again is as dense as possible but is decoupled from the sub floor. This can be done with a manufactured floating system, rubber blocks, foam or styrene sheets, or even a bed of Rockboard. All will have specific build requirement, and will vary in performance. Think about this structure like the dampers on your car. You are attempting to dissipate the vibration energy from the subfloor, reducing the flex and communication of energy through your new floor system. (See floor assembly diagram below)
Ceiling:
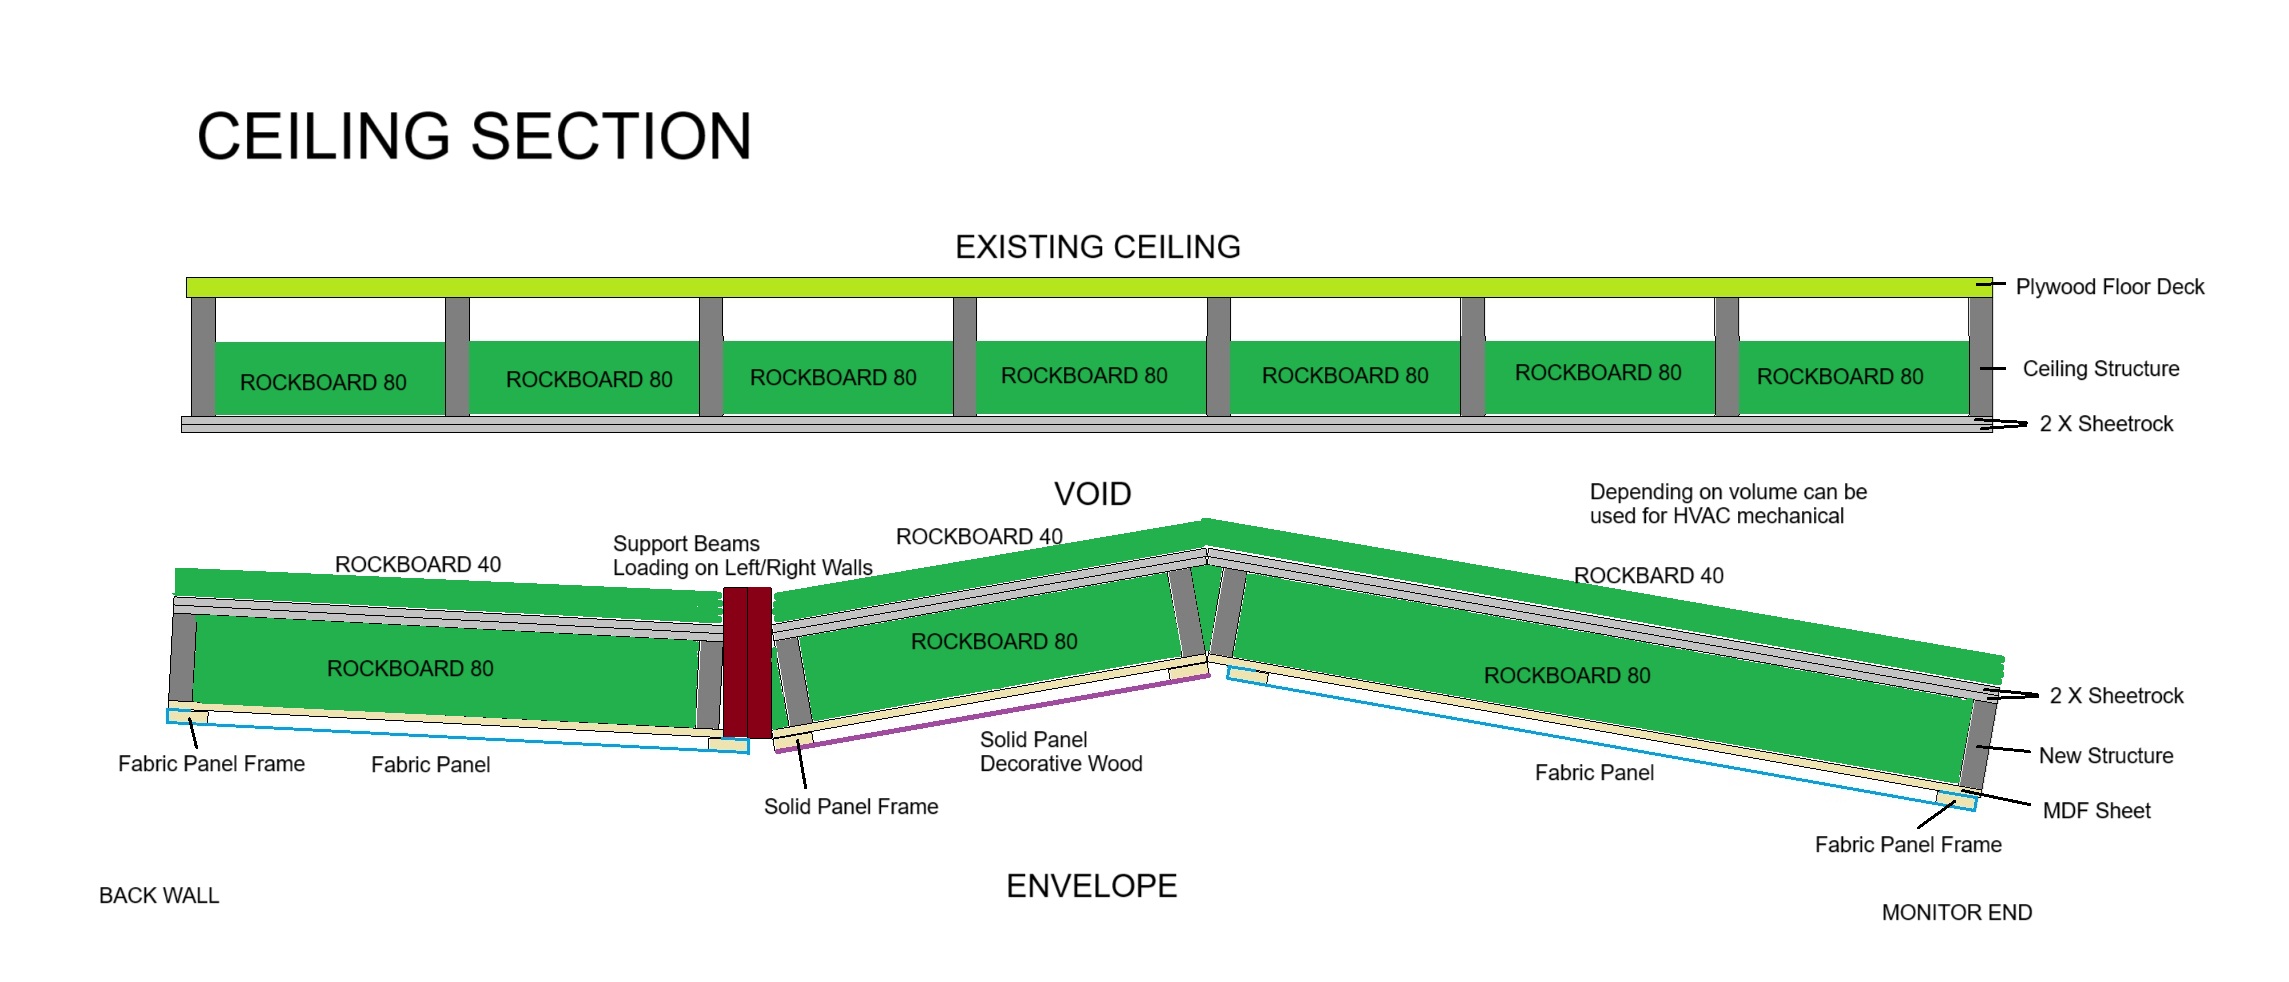
Again, if this is concrete, great. I would still create a new ceiling structure though, if headroom exists. Keep in mind, not only are you attempting to attenuate the transmission of sound in or out, but you have to consider lighting and HVAC installations. A space between the room’s existing ceiling and your new structure may give enough room to install wiring, ductwork or even air handlers. Keep in mind that these items by themselves can generate unwanted noise pollution, thus have to be addressed correctly. Also, another benefit to an additional ceiling structure is incorporation of some acoustic treatments. You will notice most studios ceiling structures are not flat or parallel to the floor. The golden rule for studios - no parallel surfaces as they can create standing waves. The ceiling structure is similar to the walls. Again, may be a good idea if not a solid concrete existing ceiling would be to remove surface treatment and insulate the void with some Rockboard, then re-skin with two layers of sheetrock. Your new ceiling structure needs to be totally decoupled from existing ceiling. You can achieve this by resting the ceiling structure on the walls. This may require some support beams to make the system structurally sound and as stiff as possible. Make sure these beams are supported at the ends all the way to the floor with a solid column like a 4x4 or a stud pack. There are several different methods to this ceiling assembly depending on scope of requirements. (See ceiling assembly diagrams below)
Doors:
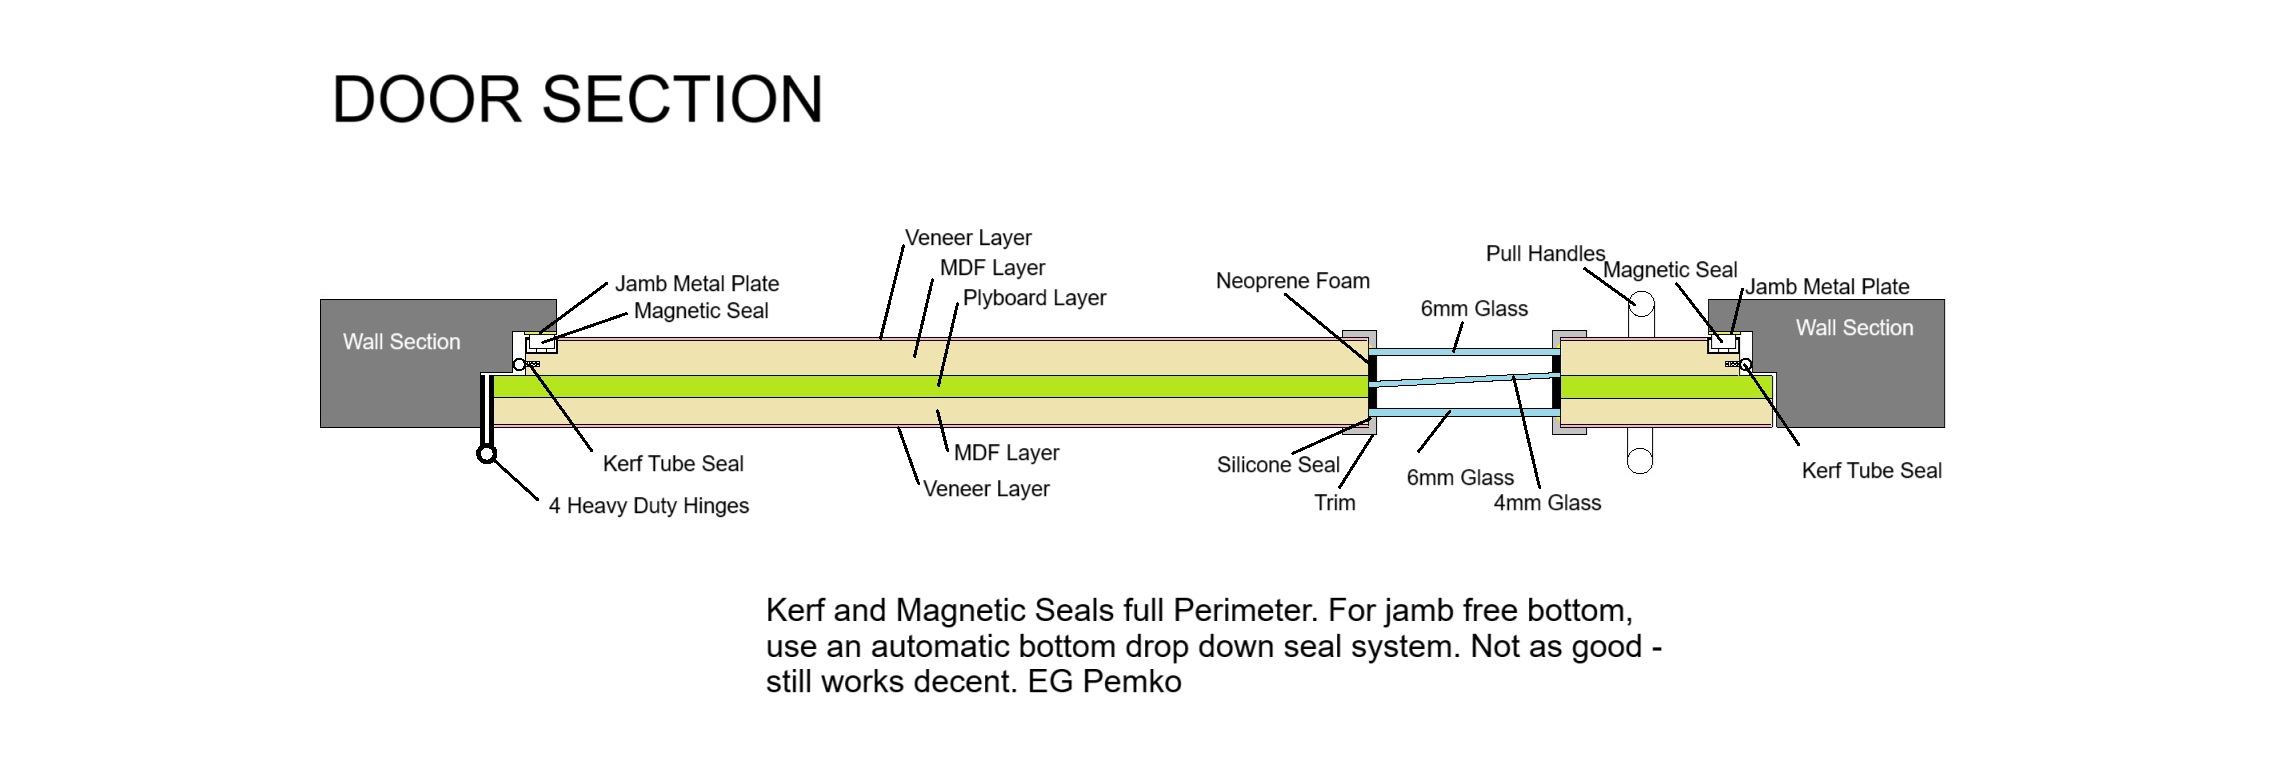
Doors are a system’s main fail point. Because they have to move to allow entrance, they are used (and abused) regularly, by nature difficult to seal and costly to build. A door needs to be solid (a minimum fire rated solid core) and have at least one continues air seal around its perimeter. Two or more is preferable. The thicker the better and using a composite design, like Plyboard and MDF. Two thinner doors are better than one thick one, but two thick doors with triple perimeter seals are best. If you require sight glass (as required for fire safety and public buildings) then two or more panes that are not parallel and are as thick as realistic should be assembled with space in between. Line the internal edges with absorbent foam. Keep these areas as small as possible. Doors are not easy to construct and will be very heavy. Having them built for you might be a good idea, but be aware they are costly. There are alternatives to doors, isolation corridors can be constructed, which are highly absorbent and have a switch back design, however they require lots more space to construct. Plan out your access design with sound leakage in mind. For instance, instead of having several doors in a control room between sensitive areas, try using a common hallway that brings a single door set from each room into a lobby area. (See lobby layout below)(See door structure diagram below)

Windows:
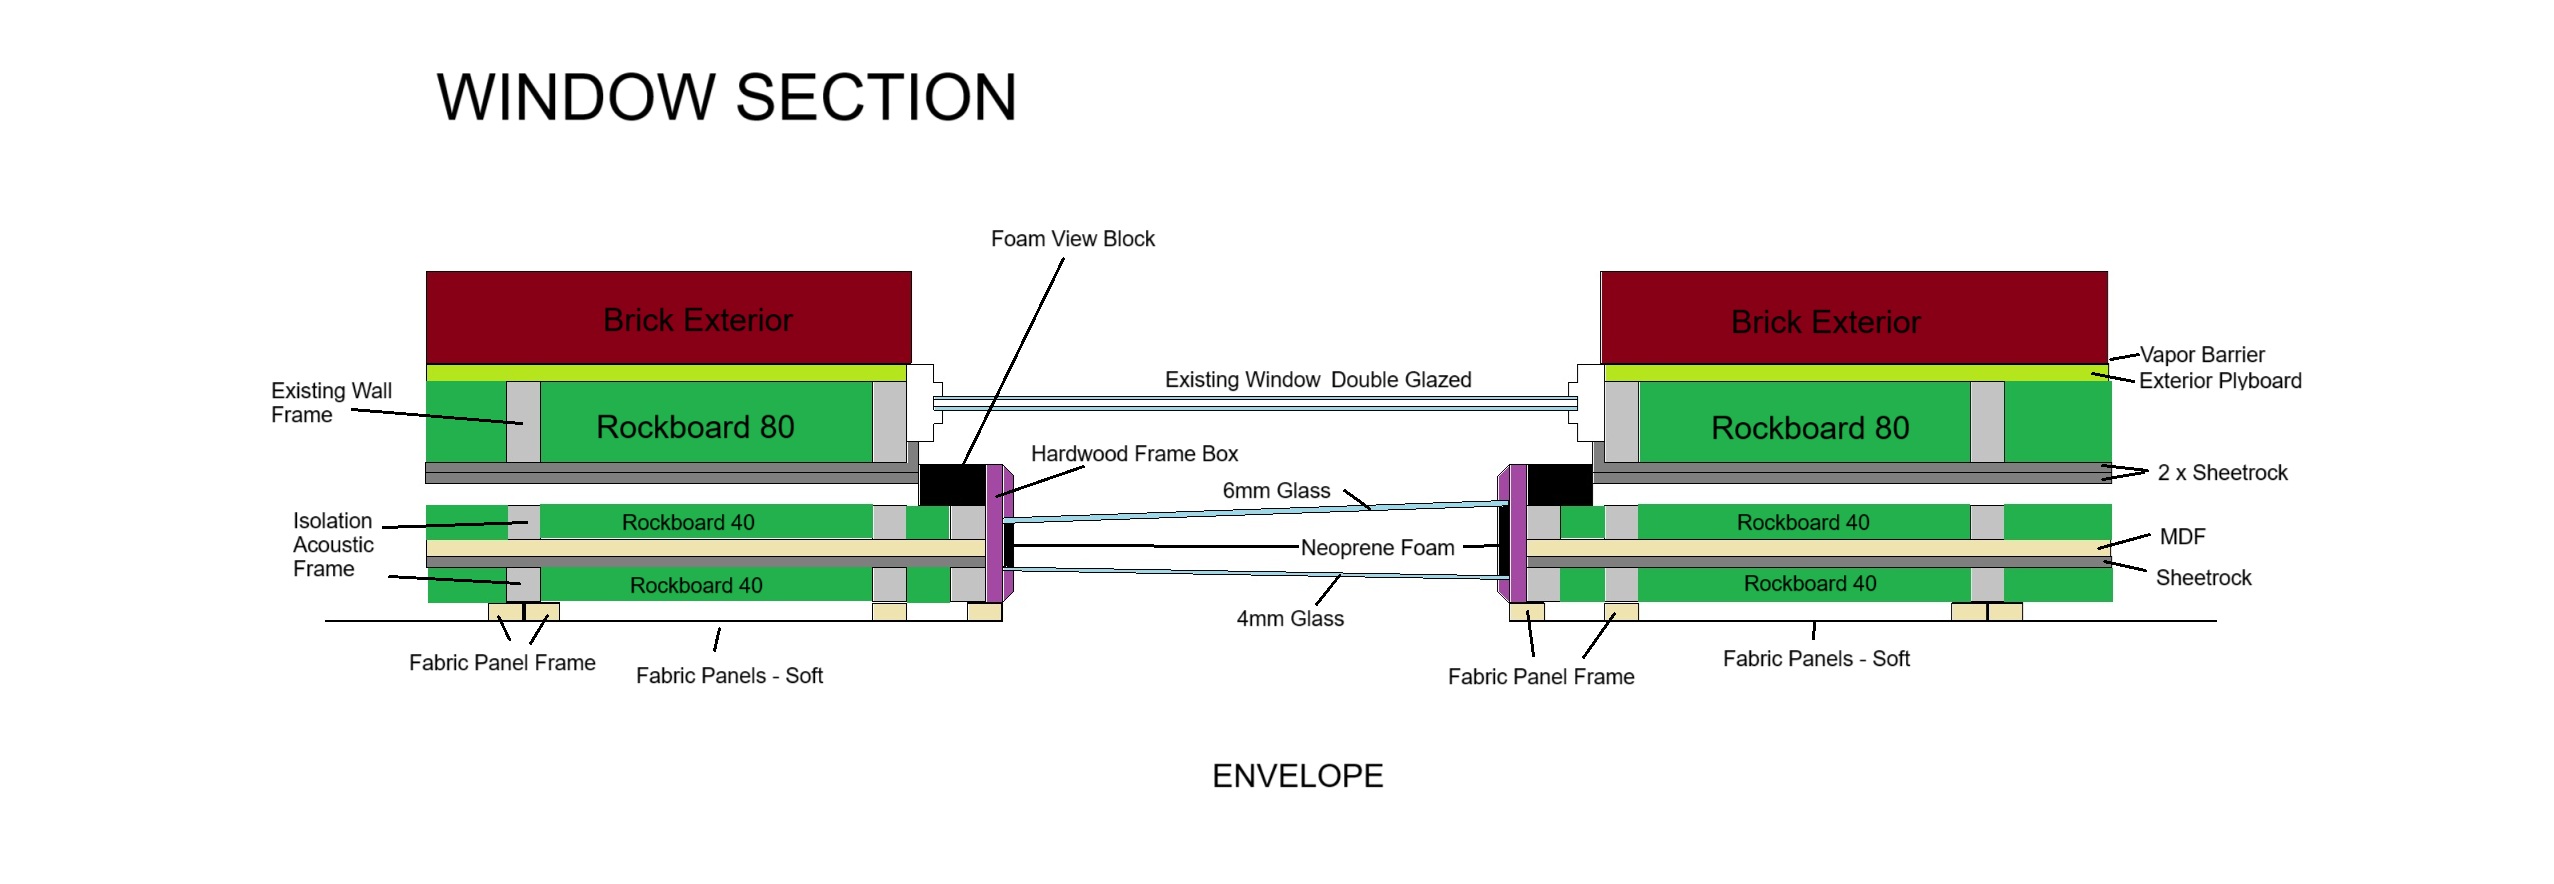
Another weak link in the structure, and often one that can be totally omitted, are windows. These maybe used to bring in outside views or light during daytime, or between rooms for better communications. Of course, with the relatively low cost of televisions now, they can often replace windows just by adding a camera. This has the benefit of making you wall system way less complicated to construct, as well as totally removing the reduced area of isolation. However if you require windows, then close detail needs to be adhered to making sure their weakness is minimized. Use multiple separate panes of glazing with varying thicknesses of glass set non parallel and decoupled from each other. Use a flexible sealant like Big Stretch to seal each pane, and also line the inner edges between glasses with absorbant foam. Try to minimize the overall size of each glass pane, as the bigger they are the more they can oscillate, thus transmitting energy. (See window diagrams below)
HVAC:
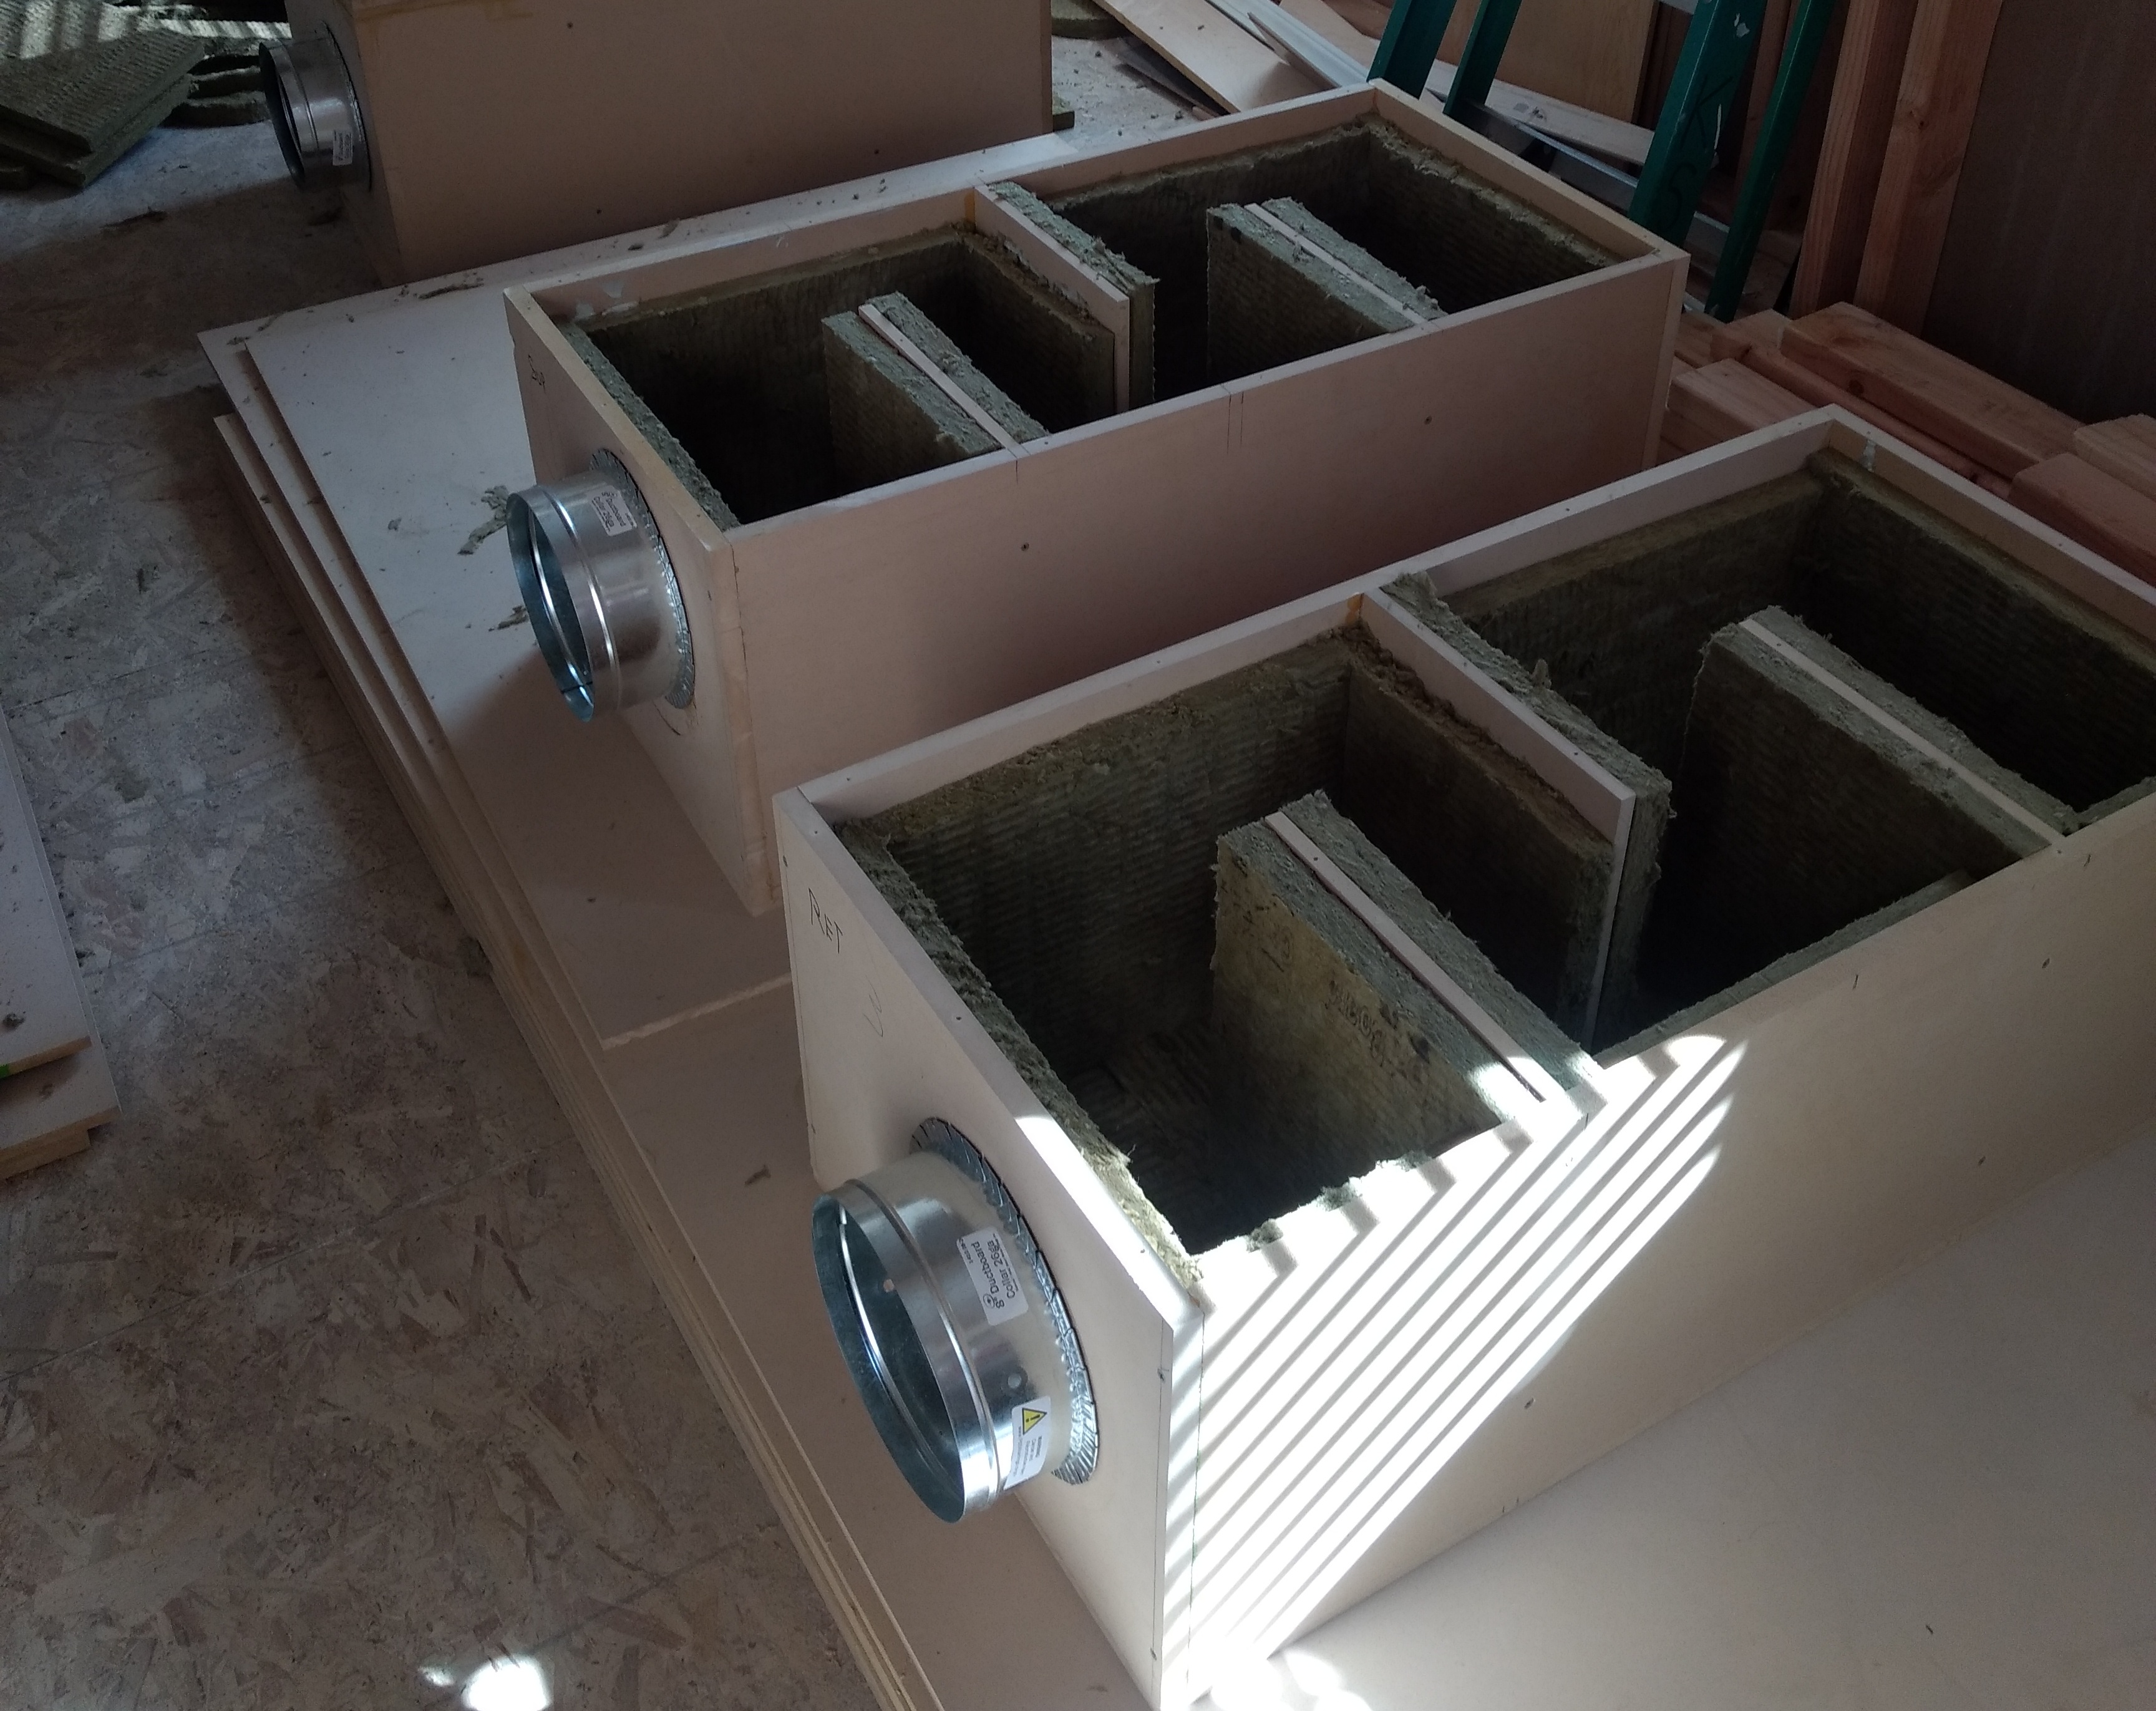
So you created this airtight box, and you wonder how long will the air last? Yes, you do need fresh air into all of your rooms. Keep in mind also, that your control room will potentially hold many pieces of heat generating equipment besides your body. Yes it is ideal, if space allows, creating a machine room that can be ventilated and noise dampened. This will definitely work for amps, computers and power supplies, and I would recommend this approach. However, you still have many user interface units that will be in the same environment as people. So at very least pumping fresh air in and exhausting the stale is critical to health and fatigue avoidance. Having a mechanical air conditioning system will just make the space more pleasurable to work in, and in my opinion is well worth the financial outlay. Keep in mind though, you are introducing holes into you tight isolation, so you must treat those penetrations correctly and as close to the room’s isolation envelope as possible. So a well constructed baffle at each penetration is required. This box can be part of the ceiling isolation structure to save space. These can be assembled simply with Plyboard/MDF and Rockwool or acoustic foam, or purchased ready built. If the air handler or fan unit is going to be installed anywhere critical for noise, you need to do research on the quietest devices available. We mainly use Mitsubishi ducted mini splits for this purpose as the air handler is slim and very quiet. Ducting with fiberglass ductboard for returns and flex for supplies works well. (See Air Attenuator diagram below)

Electrical:
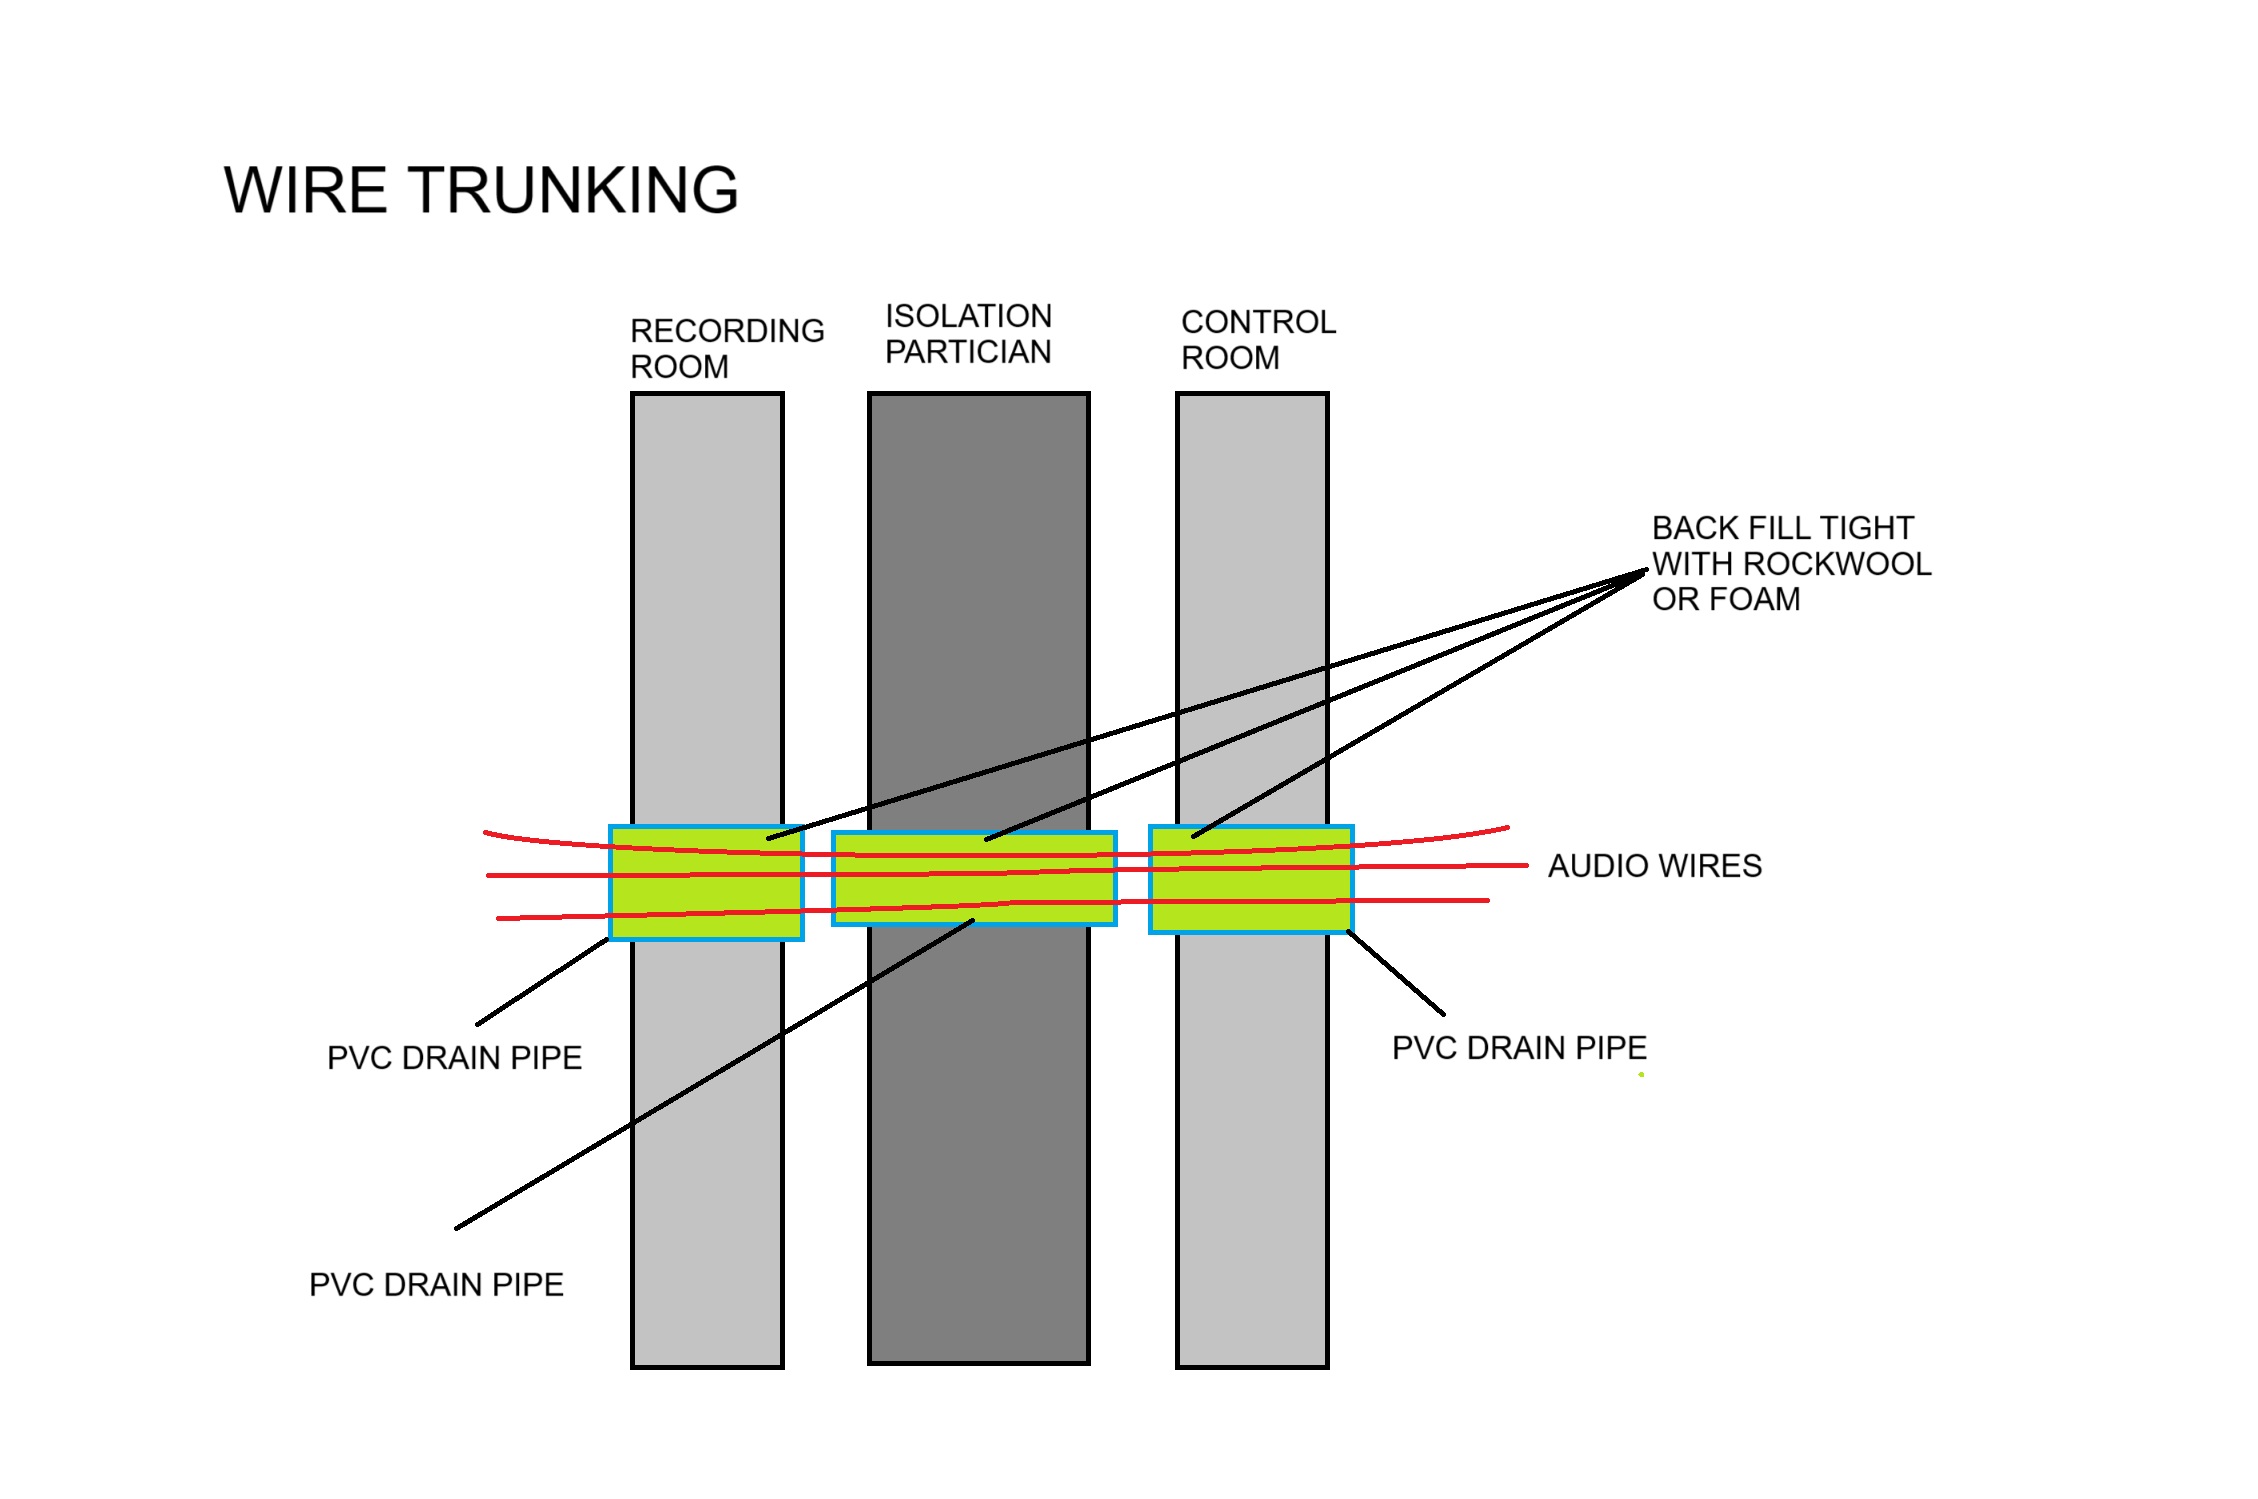
Audio cabling has to pass through isolation walls if your studio has multiple rooms. These cable runs can be a source of isolation failure, mainly at the higher frequencies. However, permanently sealing these cable-ways is not a good idea, as often cables need to be added, removed or repaired. Building in large conduit pipes in the isolation walls of each room (which are not coupled together) can make access easier. Once cables are in place, you can fill the extra space in the pipe with acoustic foam or Rockwool, which is easy to remove for maintenance. Keep these cable-ways low to the floor and in areas to allow your cable runs to be as short as possible. Cable is expensive.
Also, use of wall mounted stage breakout boxes in recording rooms are a great way to keep the area tidy, looking professional and helping to seal the cable way behind, and can be home built if needed. For larger studio facilities, under-floor raceways are a perfect solution to cable management. These can incorporate removable floor covers for access; however, they do make the floor structure more complicated to construct and strengthen. For mains power, I suggest mounting the outlet boxes in the final acoustic treatment panels, or running a technical skirting or chair rail conduit around the rooms. These look fabulous as they break up the wall look, and are extremely functional, but again, make the wall structure more complicated and costly. Keep your circuits separate. Have dedicated home runs from distribution board (breaker panel) to each set of devices. For instance, circuit 1 amps - circuit 2 outboard - circuit 3 PSUs - circuit 4 lighting - circuit 5 HVAC - circuit 6 accessories. Depending where your studio is, may require some electrical service conditioning equipment to smooth out potential noise on the supply. Keep in mind that residential electrical supply especially on older properties may lack the headroom for addition loadings. Many older properties in USA are 100amp. Calculate your studio’s operating maximum watt draw, add 20%. Do not under supply your equipment, permanent equipment damage, under performance or even distribution failure can happen.
Lighting:
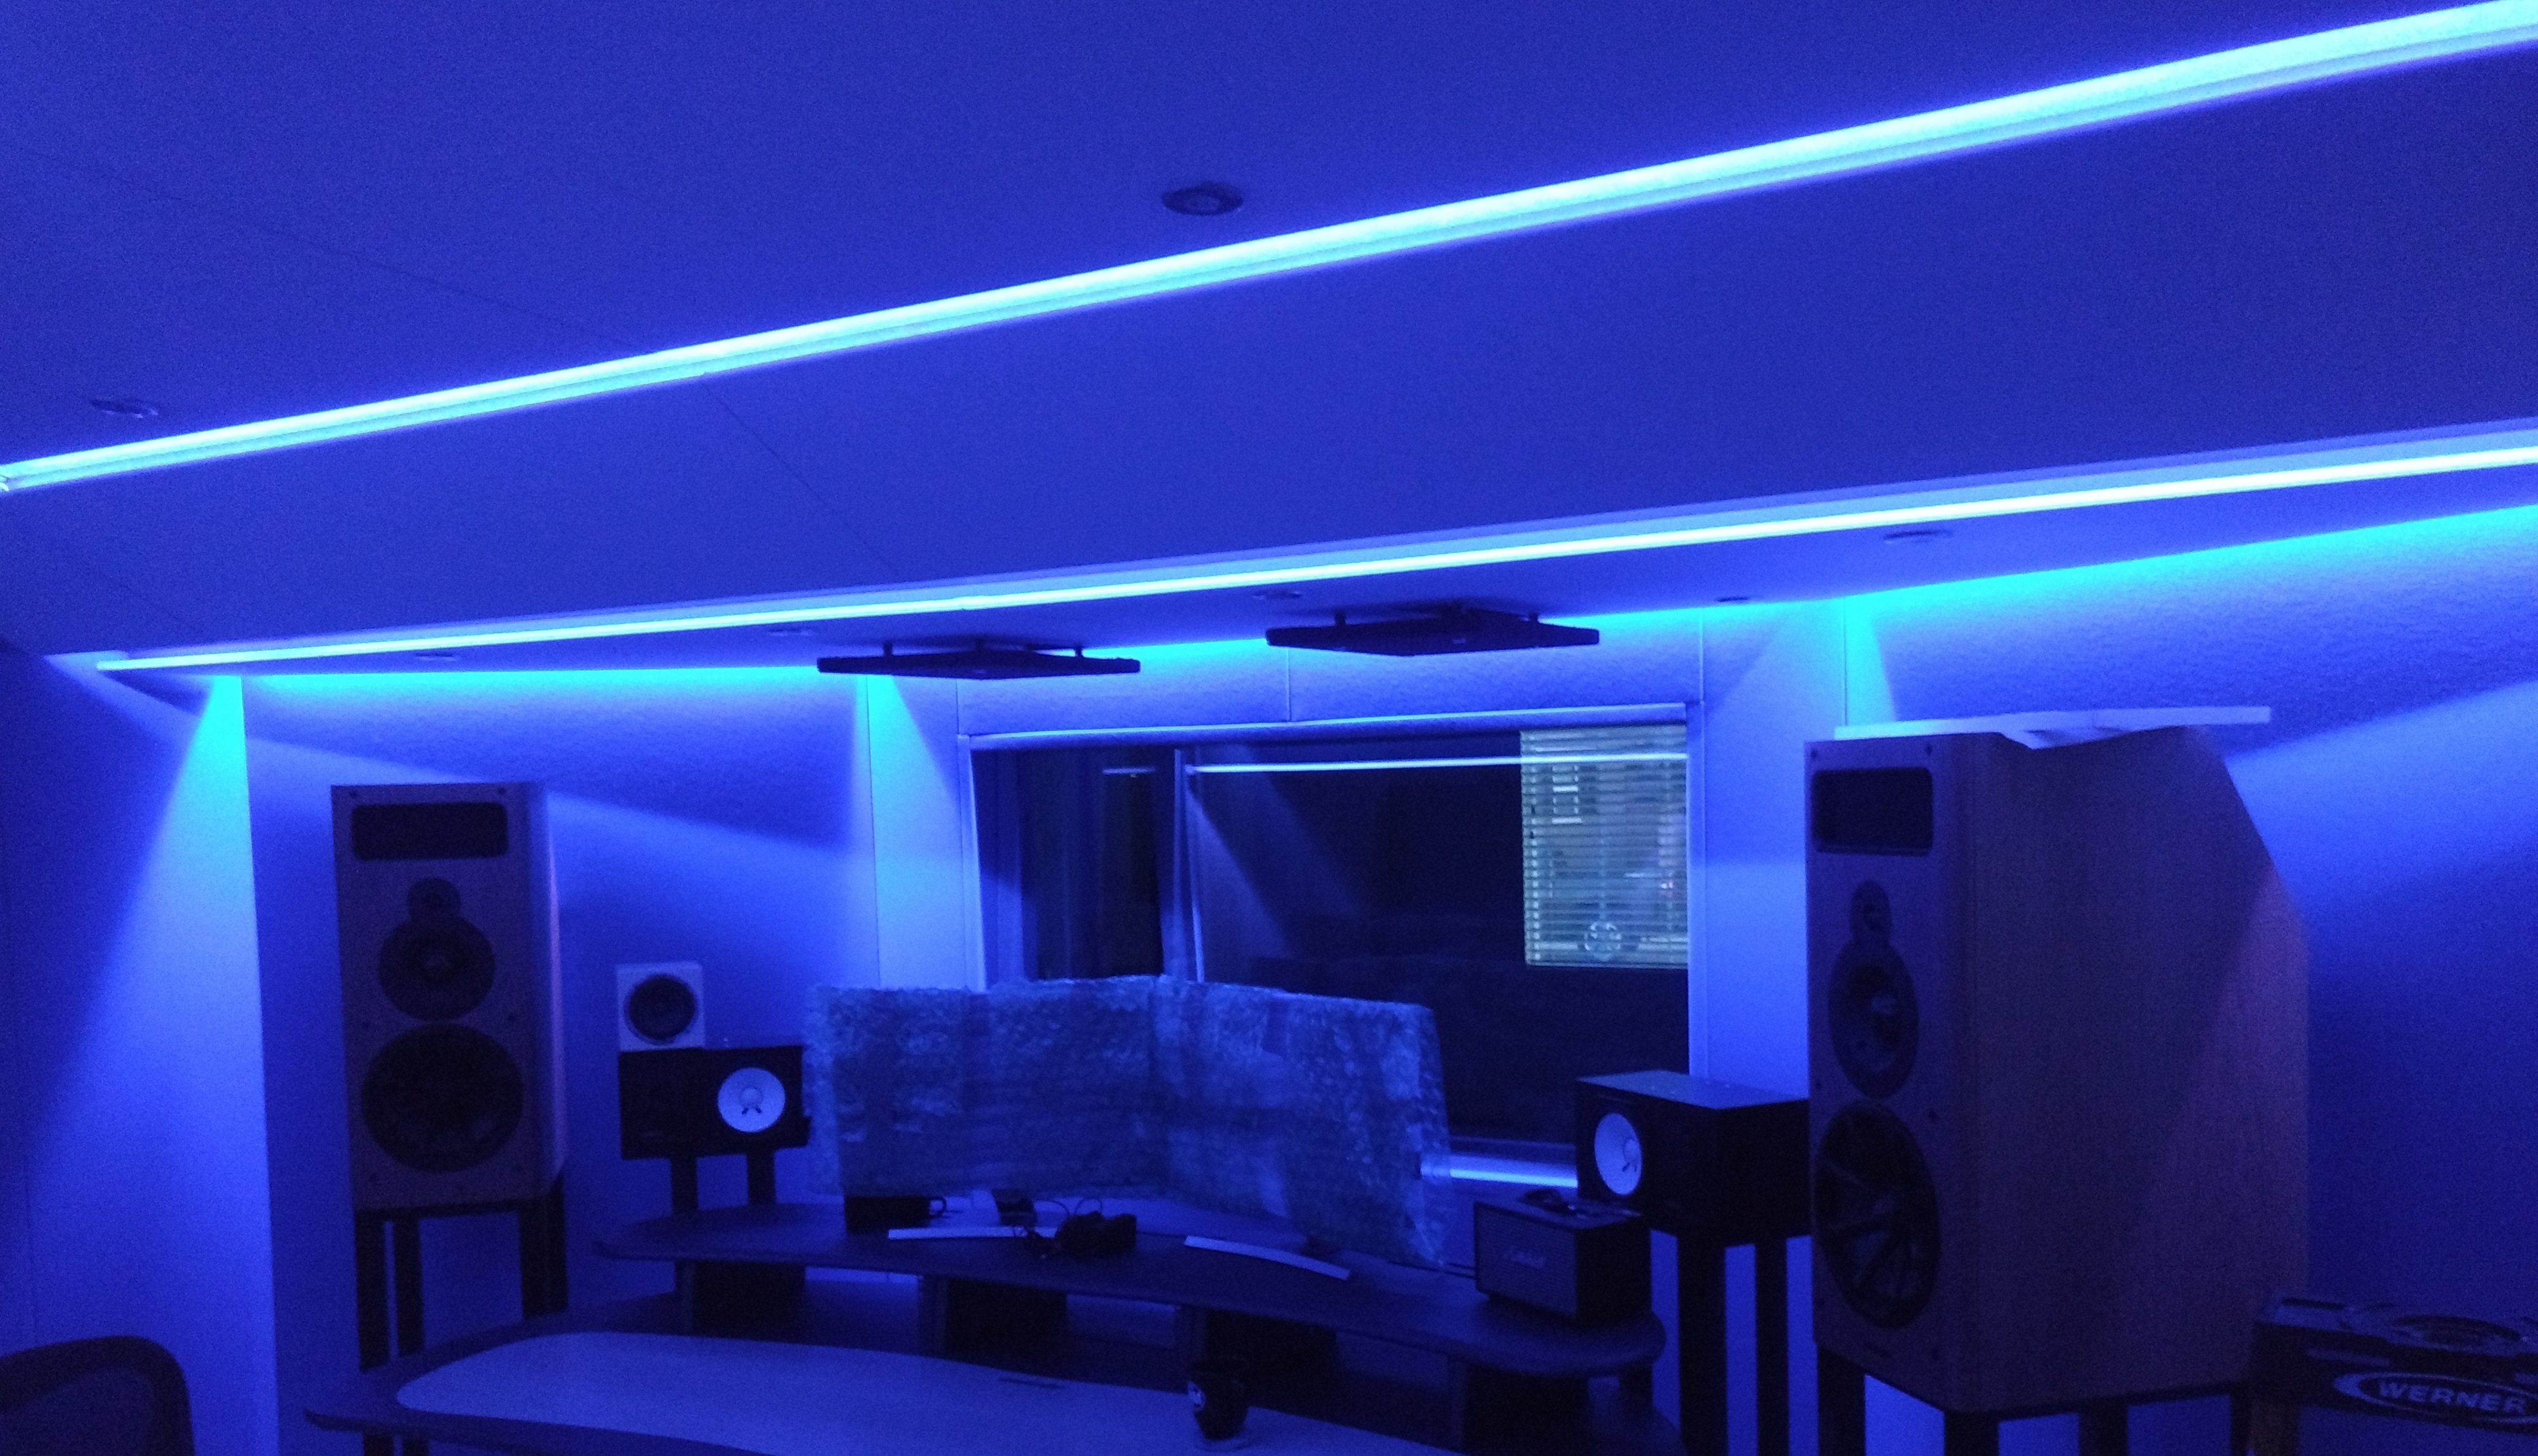
LEDs have come a long way now, which affords us many lighting options for our rooms, at often very affordable prices. Ultra thin recessed ceiling fixtures work well, as they can be mounted into acoustic panels. They often have selectable temperature settings; can be dimmed with no hum, inexpensive, low energy cost with little heat output. For accent lighting, LED RGBW tapes can drastic change the vibe of a space often controlled from a phone app, they are also inexpensive and easy to install. You just need to factor them into the design. If your ceiling panels are spaced apart giving the illusion of floating, then installing LED tapes above can give a very dynamic look. It is good practice to mount LED tape to Aluminum bar or shapes. This allows the 3M VHB glue to attach the tape permanently and keeps the LEDs cooler thus increasing longevity.
Security and Connectivity:
You are creating a very sealed environment; this can disrupt access to WiFi signals, plan for this. Run several Ethernet cables into the space from source if possible. It is a good idea to install security cameras on your property, as you will potentially have a great deal of asset cost in the area, you want to be able to monitor that while you are working or away. Having a monitor screen up on the wall with all the cameras showing is a good awareness procedure. So run those Ethernet cables also. Stepping back to the exterior windows for a second; keep in mind visibility should be one way. You don’t want people seeing into your facility. This can change at night, as the difference between the lighted room and the dark outside can change what is visible from out to in, even with so-called one way glass. Plan for your entrance door bell or access device interface. Hardwiring a visible annunciator in your line of sight may be a good practice. If you intend to use your phone, consider having a WiFi router or repeater in the space. Key here is, run all these cables and any others you can conceivably envision requiring, before doing any isolation work.
Acoustic Treatment:
As previously mentioned, the technical side of this topic is really out of the scope of this article, thus really requires the years of skill of an acoustic design engineer to plan this out for your specific space and requirements. However, I will give you some pointers, and best practices. At very least you want to avoid anything nasty. In the control room where you will generally be sitting the most, think about your seating position and thus the correct focal point for your main monitors. This is basically the golden triangle, the perfect spot to monitor your mix. Everything around that point has to be assembled to not degrade that position. This can include sound reflecting from other surfaces, vibrating fixtures, equipment hum, air movements, and exterior leakage. Hopefully by now you have mitigated the external issues, and air movement sounds, during the isolation stage.
Reflection:
Control Room:
Probably the easiest way to approach this, if you don’t have the budget for a professional design, would be to sketch the layout of the room with the monitors and your seating position. Then project the sound energy plane all the way out from each monitor with lines. See how these lines intersect the walls, ceiling and floor. The higher frequencies are lower energy and will dissipate (be absorbed) by softer surfaces, a couch, carpet or fabric walls. The lower frequencies, can pass through, hit something hard and reflect back, also potentially vibrating that structure, thus either transmitting that energy to the outside of the envelope or to other structures inside the envelope. A bass trap is going to be required to mitigate the LF, especially if your monitors have an excellent dynamic range. You don’t want those longer waves returning back to your seating position, or bouncing around the room. A basic trap can be built just using a good depth of rockwool, perhaps in a rear corner that has little other use. There are lots of different trap designs out there; many specifically designed to capture a certain range of frequencies. This is achieved using specific size holes or slots. However, a specific trap design may require post completion testing, if you find problems with the room at certain frequencies.
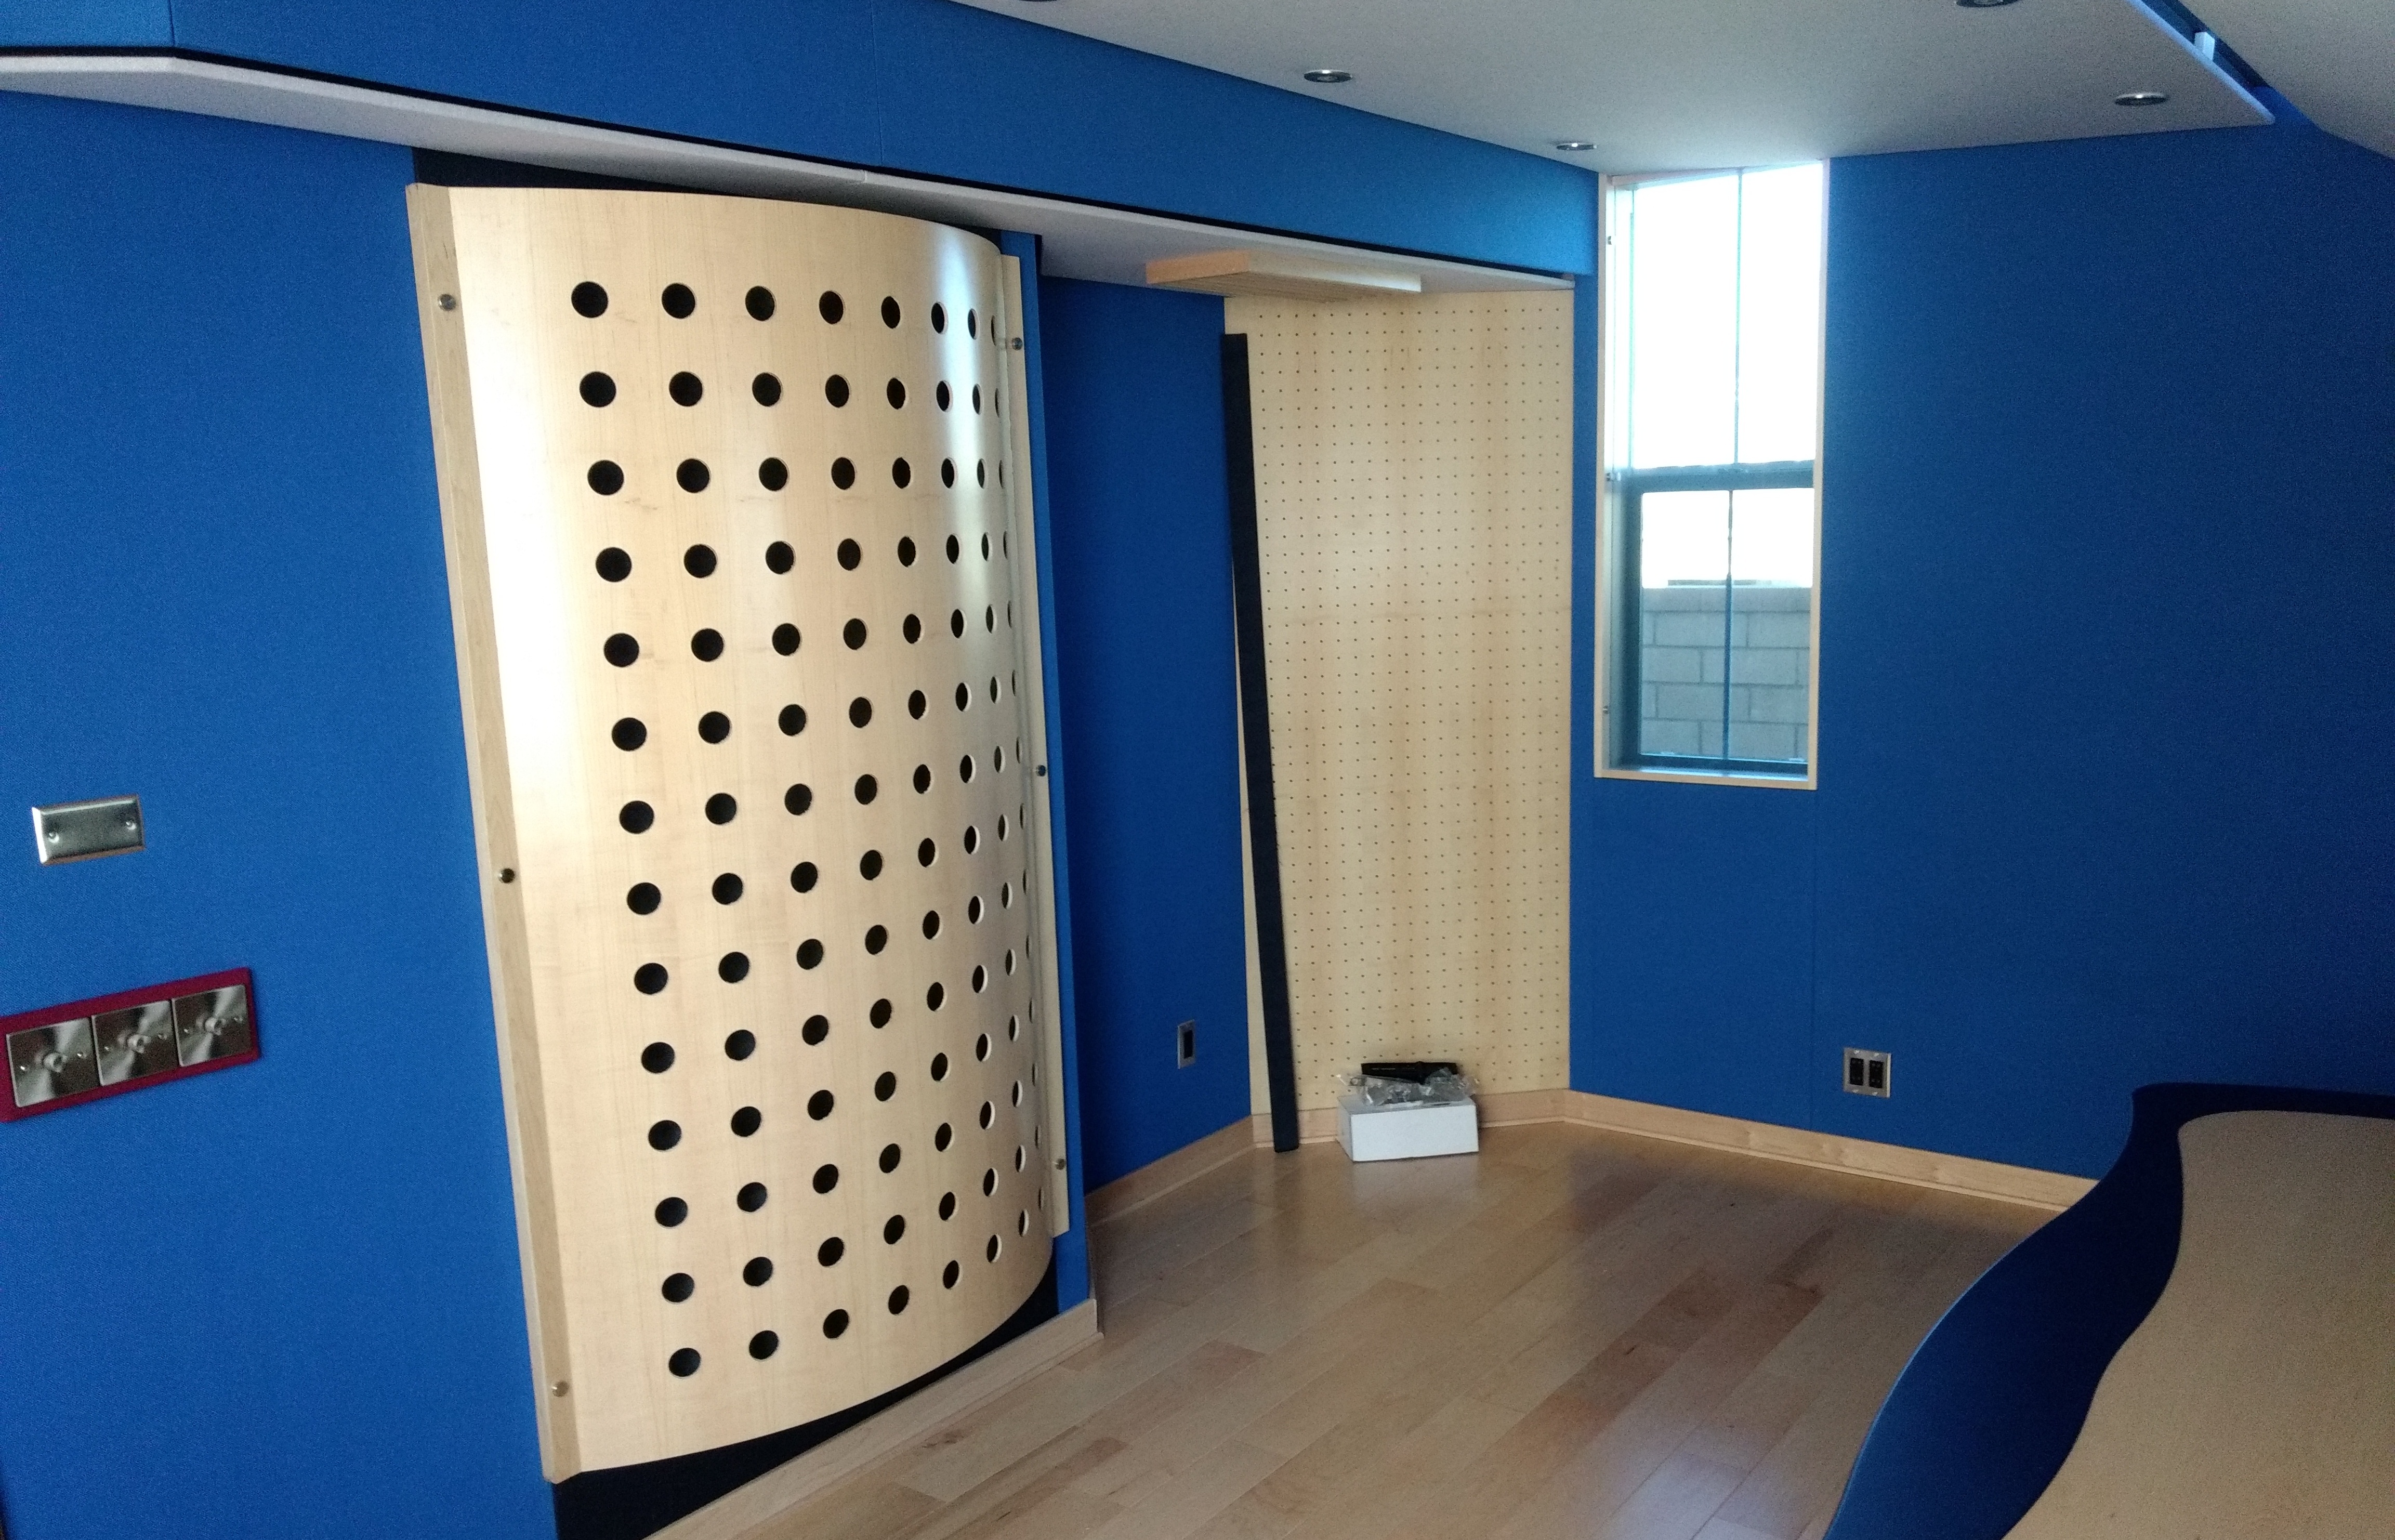
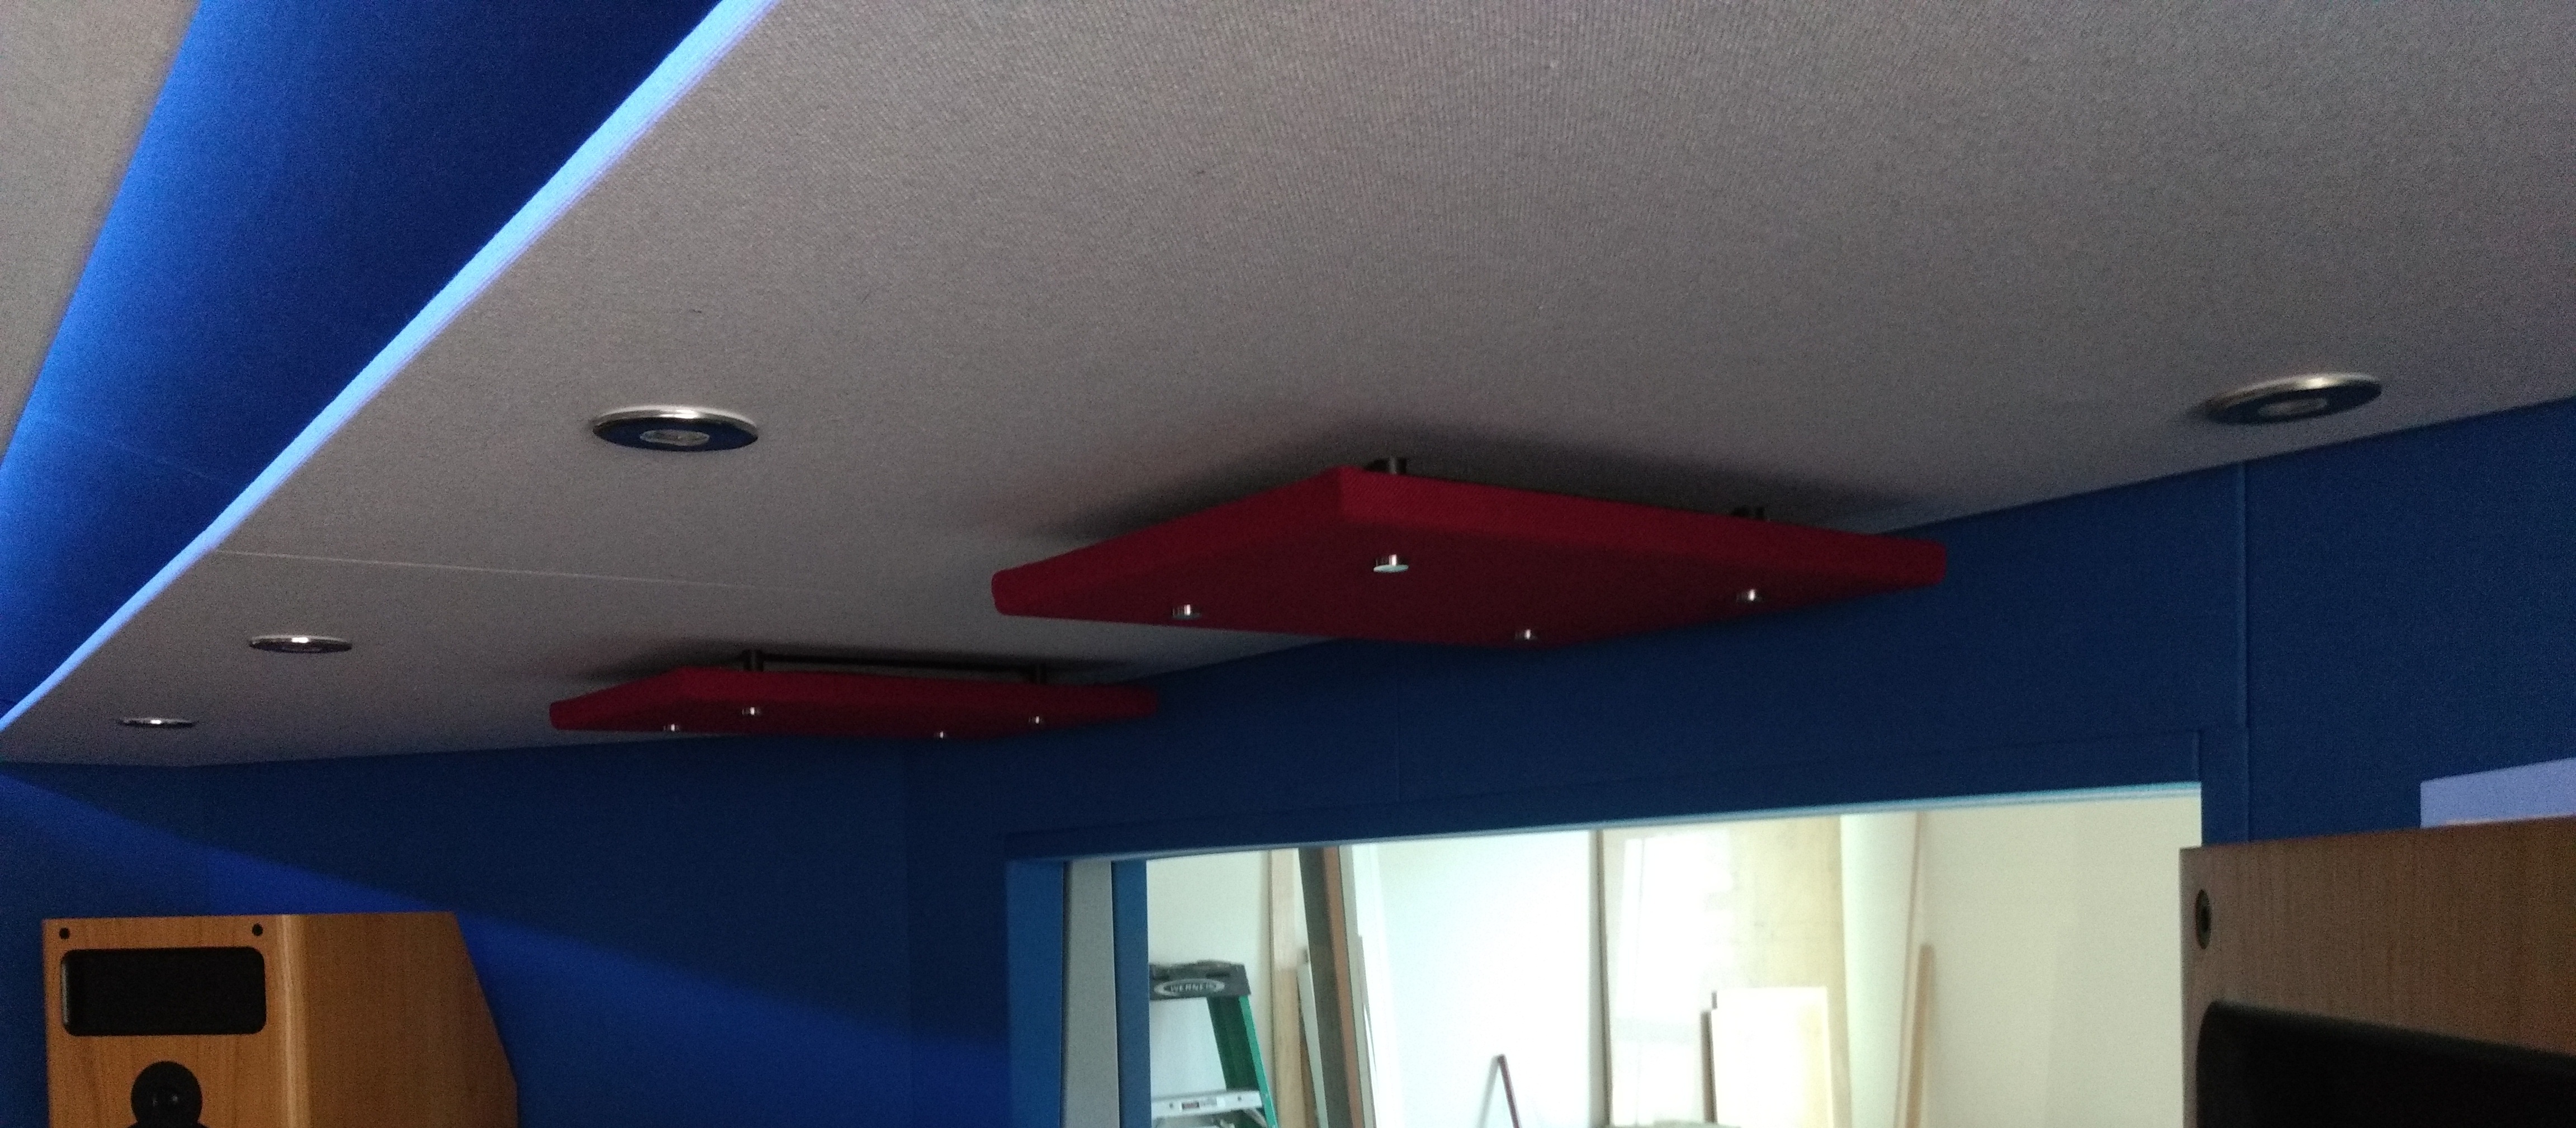
Generally for your acoustic treatments, create wall and ceiling planes which are not large flat parallel surfaces. Be mindful of those hard surfaces like windows and doors. Doors can be treated with an absorbent face if needed, but not windows, except for curtains. Creating fabric covered panels mounted to an absorbent sub wall/ceiling is an easy way to achieve this. Don’t go crazy with all soft surfaces though. You don’t want the whole room to be an anechoic chamber, or resembling a vocal booth. You need some color in the response of the room, keep in mind who ultimately will be listening to your creations and mores the point, where. The walls adjacent to the monitors should be soft; however, you can mix the back up a little. It is a good practice to slope the ceiling up and away from the monitor wall, but again you can mix in some harder facets into a zigzag ceiling profile. Using suspended panels is a good way to achieve the ceiling treatment. This way if you have issues, you could replace or switch them around and is a good place for those recessed lights. A good idea also is to suspend panels over the air intakes, lining the backs with Rockwool or acoustic foam to dissipate any air noise and to create a more waterfall effect for the airflow. These should be over your working position, as this is where heat will generally be created and observed most. Carpet is a good idea for the floors; however, a hardwood or laminate area around your workstation is best, as it allows your chair to freely move around.
Recording Rooms.
These rooms generally have specific purposes. A Vocal booth needs to be flat. You want the microphone to record only what is being produced by the vocalist. You can treat this as a totally separate room or as a section (closet like) of another recording room or even the Control room. Either way, attempt to have all surfaces absorbent, including the door if possible. Limit windows, Closed Circuit TV is a better option, and pay special attention to your ventilation noise control. Yes, this space does need ventilating, even if it is just recirculating from its host room. A Drum room is generally going to have harder surfaces due to the way drums create sounds. Be especially careful here with standing waves, have the walls and ceiling non parallel, and over-size the space as much as you can. Again this room can be its own room, a room inside a host, or even just a semi open area of a general recording space. Often, Drum and Vocal booths are remote, not physically connected to the main area or Control room. If this is the plan, then make sure you plan and budget long runs of high quality shielded audio or multi-core cables rated for the length of run you require. The main Recording room needs to have some serious thought regarding its main usage. You need to be as flexible as possible with its acoustic properties. They often call them live rooms, thus a good mix of bright and dead areas, it needs to be dynamic. Use of reversible panels which are hard one side and soft the other, which can easily be rotated would be a good choice, especially on smaller rooms. Mix it up here, think about the different instruments or vocals you may be recording, and have areas that can dynamically change or enhance their production. Make this area visually bright and happy. Use color schemes and design elements that make this area a pleasure to perform in. Design also the air conditioning system, be it a circulating fan or HVAC, to provide comfortable fresh clean air. Again, use hanging panels over the air supplies to reduce stray noises. Have mood lighting in this room also, with use of LED recessed and RGBW tapes. It is also a good idea to have these lighting systems controlled from the Control room.

Floating Rooms:
For the best results, especially for isolation, creating a floating box for each room is the way to go. As previously mentioned, this requires a good amount of floor space and headroom. Commercial spaces or custom built facilities work best. Basically, all the previous mentioned systems would be assembled the same way with some tweaks, exception being, all being hoisted from the floating floor system and not the existing building wooden floor or slab. The floating floor assembly would be beefed up around its perimeter and host the wall assemblies. These walls would create the isolation envelope and host the attachment of the ceiling structure. The goal with this box is to achieve as close to possible air tightness. Your acoustic treatment would then be added to these walls and ceiling structures. In a large open space, like those afforded by commercial units, these room boxes need to have isolation patrician walls between each, as shown in the Isolation Lobby diagram above. It is important to keep in mind that there should be no mechanical bonding from room to any other structure. The only contact point would be the room to existing floor via an isolation medium, as shown above. This is critical! So pay special attention at door and window thresholds. Because the room’s floor surface is now substantially higher than the existing floor, you may have to increase the existing floor surface height for ease of access. This may prove extremely expensive for large non critical areas as with Offices or Reception. Toilet facilities may be impossible to have floor height increased. A transition is usually required back down to existing floor height. For a studio build than includes a new building, designing the concrete slab height differences would be a good plan, and save on the budget. Make sure you calculated heights for finished floors are accurate and factor in float room weight compression of the isolation medium. Keep in mind, while steps work for pedestrian traffic, they may cause loading/unloading of instruments and equipment difficult or impossible.

Conclusion:
In this article I have attempted to explain some of the design and build elements involved in the creation of recording spaces. The above is not the only way to achieve the goal of a standardized well balanced system, but some guidelines and best practices to help you achieve that goal. Today, any task one needs to complete can be assisted with research on the internet. Unfortunately, there is good and bad advice out there, so the more research the better chances of success. Talk to other studio owners and users, visit their facilities, and inquire their likes and dislikes. Even with so-called studio build companies, as with home builders, quality is not always guaranteed and is more often questionable. If you are going the professional design and/or build route, do diligence and visit their previous builds and talk to their clients. No company would deny you access, if they are confident in their product and customer relations. Check out online reviews, especially the bad ones.
My recording industry experience comes from working with The Studio People, UK and their over three decades in design, turnkey construction and audio installations. Before the 1990s the owners ran a successful pro-audio manufacturing business for over 20 years, manufacturing everything from Gates to large mixing consuls and multi-track tape machine. So they know a thing or two about all aspects of the industry. I am now located in the PNW of USA , however, most of my work has been in California. Having designed and constructed environments and displays for the art and jewelry industry, manufacturing, residential construction, and of course recording studios. I am available for help and advice on your project, help with a self build, or a turnkey project. All the technical design comes from acoustic engineers at TSP in the UK.
Good Luck!
Stephen Keeling
January 2025